Kubernetes Cluster Setup#
Tip
Setting up Kubernetes and SkyPilot on reserved GPUs? The SkyPilot team is happy to help — fill out this form to get in touch.
Note
This is a guide for cluster administrators on how to set up Kubernetes clusters for use with SkyPilot.
If you are a SkyPilot user and your cluster administrator has already set up a cluster and shared a kubeconfig file with you, Submitting tasks to Kubernetes explains how to submit tasks to your cluster.
Setting up Kubernetes cluster for SkyPilot#
To prepare a Kubernetes cluster to run SkyPilot, the cluster administrator must:
Deploy a cluster running Kubernetes v1.20 or later.
Set up GPU support.
After these required steps, perform optional setup steps as needed:
Once completed, the administrator can share the kubeconfig file with users, who can then submit tasks to the cluster using SkyPilot.
Step 1 - Deploy a Kubernetes cluster#
Tip
If you already have a Kubernetes cluster, skip this step.
Below we link to minimal guides to set up a new Kubernetes cluster in different environments, including hosted services on the cloud.
Step 2 - Set up GPU support#
To utilize GPUs on Kubernetes, your cluster must:
If using NVIDIA GPUs, have the
nvidia.com/gpuresource available on all GPU nodes and havenvidiaas the default runtime for your container engine.If you are following our deployment guides or using GKE or EKS, this would already be set up. Else, install the Nvidia GPU Operator.
If using AMD GPUs, have the
amd.com/gpuresource available on all GPU nodes and install the AMD GPU Operator.Follow the instructions in AMD GPUs on Kubernetes to install the AMD GPU Operator.
Have a label on each node specifying the GPU type. See Setting up GPU labels for more details.
Tip
To verify the Nvidia GPU Operator is installed after step 1 and the nvidia runtime is set as default, run:
$ kubectl apply -f https://raw.githubusercontent.com/skypilot-org/skypilot/master/tests/kubernetes/gpu_test_pod.yaml
$ watch kubectl get pods
# If the pod status changes to completed after a few minutes, Nvidia GPU driver is set up correctly. Move on to setting up GPU labels.
Note
Refer to Notes for specific Kubernetes distributions for additional instructions on setting up GPU support on specific Kubernetes distributions, such as RKE2 and K3s.
Setting up GPU labels#
Tip
If your cluster has the Nvidia GPU Operator installed or you are using GKE or Karpenter, your cluster already has the necessary GPU labels. You can skip this section.
To use GPUs with SkyPilot, cluster nodes must be labelled with the GPU type. This informs SkyPilot which GPU types are available on the cluster.
Currently supported labels are:
nvidia.com/gpu.product: automatically created by Nvidia GPU Operator.cloud.google.com/gke-accelerator: used by GKE clusters.karpenter.k8s.aws/instance-gpu-name: used by Karpenter.skypilot.co/accelerator: custom label used by SkyPilot if none of the above are present.
Any one of these labels is sufficient for SkyPilot to detect GPUs on the cluster.
Tip
To check if your nodes contain the necessary labels, run:
output=$(kubectl get nodes --show-labels | awk -F'[, ]' '{for (i=1; i<=NF; i++) if ($i ~ /nvidia.com\/gpu.product=|cloud.google.com\/gke-accelerator=|karpenter.k8s.aws\/instance-gpu-name=|skypilot.co\/accelerator=/) print $i}')
if [ -z "$output" ]; then
  echo "No valid GPU labels found."
else
  echo "GPU Labels found:"
  echo "$output"
fi
Automatically labelling nodes#
If none of the above labels are present on your cluster, we provide a convenience command that automatically detects GPU types and labels each node with the skypilot.co/accelerator label. You can run it with:
$ sky gpus label

Created GPU labeler job for node ip-192-168-54-76.us-west-2.compute.internal
Created GPU labeler job for node ip-192-168-93-215.us-west-2.compute.internal
GPU labeling started - this may take 10 min or more to complete.
To check the status of GPU labeling jobs, run `kubectl get jobs --namespace=kube-system -l job=sky-gpu-labeler`
You can check if nodes have been labeled by running `kubectl describe nodes` and looking for labels of the format `skypilot.co/accelerator: <gpu_name>`.
Note
This command currently only supports NVIDIA GPUs. AMD GPUs must be labeled manually. Please follow the instructions in “Manually labelling nodes” section below.
Note
If the GPU labelling process fails, you can run sky gpus label --cleanup to clean up the failed jobs.
Manually labelling nodes#
You can also manually label nodes, if required. Labels must be of the format skypilot.co/accelerator: <gpu_name> where <gpu_name> is the lowercase name of the GPU.
For example, a node with H100 GPUs must have a label skypilot.co/accelerator: h100, and a node with MI300 GPUs must have a label skypilot.co/accelerator: mi300.
Use the following command to label a node:
kubectl label nodes <node-name> skypilot.co/accelerator=<gpu_name>
Note
GPU labels are case-sensitive. Ensure that the GPU name is lowercase if you are using the skypilot.co/accelerator label.
Verifying setup#
Once the cluster is deployed and you have placed your kubeconfig at ~/.kube/config, verify your setup by running sky check:
sky check kubernetes
This should show Kubernetes: Enabled without any warnings.
You can also check the GPUs available on your nodes by running:
$ sky gpus list --infra k8s
Kubernetes GPUs
GPU   REQUESTABLE_QTY_PER_NODE  UTILIZATION
L4    1, 2, 4                   12 of 12 free
H100  1, 2, 4, 8                16 of 16 free

Kubernetes per node GPU availability
NODE                       GPU       UTILIZATION
my-cluster-0               L4        4 of 4 free
my-cluster-1               L4        4 of 4 free
my-cluster-2               L4        2 of 2 free
my-cluster-3               L4        2 of 2 free
my-cluster-4               H100      8 of 8 free
my-cluster-5               H100      8 of 8 free
Optional setup#
The following setup steps are optional and can be performed based on your specific requirements:
Set up NFS and other volumes#
SkyPilot supports mounting various types of volumes to your pods on Kubernetes:
Persistent volumes: Independently managed volumes with lifecycle separate from clusters, ideal for long-term data storage and sharing datasets across clusters. These are backed by Kubernetes PVCs on block storage (e.g., AWS EBS, GCP Persistent Disk) or distributed file systems (e.g., JuiceFS, Nebius shared file system, AWS EFS, GCP Filestore).
Ephemeral volumes: Automatically created and deleted with your cluster, suitable for temporary storage and caches that are cluster-specific. Also backed by Kubernetes PVCs.
Other volume types: Mount hostPath, NFS, and other Kubernetes volume types by overriding SkyPilot’s
pod_config.
For detailed information on configuring and using volumes, see Volumes on Kubernetes.
Set up priority and preemption#
By default, all SkyPilot pods use the default Kubernetes priority class configured in your cluster. Pods will queue if there are no resources available.
To assign priorities to SkyPilot pods and enable preemption to prioritize critical jobs, refer to Priority and Preemption.
Set up namespaces and service accounts#
Tip
By default, SkyPilot runs in the namespace configured in current kube-context and creates a service account named skypilot-service-account to run tasks.
This step is not required if you use these defaults.
If your cluster requires isolating SkyPilot tasks to a specific namespace and restricting the permissions granted to users, you can create a new namespace and service account for SkyPilot to use.
The minimal permissions required for the service account can be found on the Minimal Kubernetes Permissions page.
To simplify the setup, we provide a script that creates a namespace and service account with the necessary permissions for a given service account name and namespace.
# Download the script
wget https://raw.githubusercontent.com/skypilot-org/skypilot/master/sky/utils/kubernetes/generate_kubeconfig.sh
chmod +x generate_kubeconfig.sh

# Execute the script to generate a kubeconfig file with the service account and namespace
# Replace my-sa and my-namespace with your desired service account name and namespace
# The script will create the namespace if it does not exist and create a service account with the necessary permissions.
SKYPILOT_SA_NAME=my-sa SKYPILOT_NAMESPACE=my-namespace ./generate_kubeconfig.sh
You may distribute the generated kubeconfig file to users who can then use it to submit tasks to the cluster.
Set up for exposing services#
Tip
If you are using GKE or EKS or do not plan expose ports publicly on Kubernetes (such as sky launch --ports, SkyServe), no additional setup is required. On GKE and EKS, SkyPilot will create a LoadBalancer service automatically.
Running SkyServe or tasks exposing ports requires additional setup to expose ports running services. SkyPilot supports either of two modes to expose ports:
LoadBalancer Service (default)
Refer to Exposing Services on Kubernetes for more details.
Set up FUSE proxy#
By default, SkyPilot automatically sets up a FUSE proxy to allow Pods created by SkyPilot to perform FUSE mounts/unmounts operations without root privileges. The proxy requires root privileges and SYS_ADMIN capabilities, which may require additional security audits.
In most clusters, SkyPilot handles setting up the FUSE proxy as a privileged DaemonSet, and no manual configuration is required by the user.
However, if you are operating in a cluster with restricted permissions, you can deploy the DaemonSet externally, to avoid the need to grant SkyPilot the permission to create privileged DaemonSets. SkyPilot will automatically discover the DaemonSet and use it as the FUSE proxy:
# If you do not want to grant SkyPilot the ability to create privileged daemonsets, manually deploy the FUSE proxy:
$ kubectl create namespace skypilot-system || true
$ kubectl -n skypilot-system apply -f https://raw.githubusercontent.com/skypilot-org/skypilot/master/sky/provision/kubernetes/manifests/fusermount-server-daemonset.yaml
Set up proxy configuration#
If your Kubernetes cluster is behind a corporate proxy or firewall, SkyPilot pods may fail to download dependencies during setup. This typically manifests as the installation getting stuck during conda initialization or package downloads.
To resolve this, you can configure proxy settings for SkyPilot pods by adding environment variables to your pod configuration in ~/.sky/config.yaml:
# ~/.sky/config.yaml
kubernetes:
  pod_config:
    spec:
      containers:
        - env:
            - name: HTTP_PROXY
              value: http://proxy-host:3128
            - name: HTTPS_PROXY
              value: http://proxy-host:3128
            - name: NO_PROXY
              value: localhost,127.0.0.1
            - name: http_proxy
              value: http://proxy-host:3128
            - name: https_proxy
              value: http://proxy-host:3128
            - name: no_proxy
              value: localhost,127.0.0.1
Replace proxy-host:3128 with your actual proxy server address and port.
Both uppercase and lowercase versions of the proxy environment variables are included for maximum compatibility across different tools and libraries.
Set up host networking#
For workloads that need the node’s network stack directly — for example, RDMA/InfiniBand for multi-node training, or to avoid CNI overhead for latency-sensitive jobs — you can run SkyPilot pods with host networking by setting hostNetwork: true in the pod spec:
# ~/.sky/config.yaml
kubernetes:
  pod_config:
    spec:
      hostNetwork: true
With hostNetwork: true, a pod shares the node’s network namespace instead of getting its own. Normally this would cause two SkyPilot pods scheduled to the same node to collide on Ray’s default ports and on the node’s SSH port. SkyPilot handles this automatically: before Ray starts, each pod probes a free port set on the node, the head publishes its chosen ports to a <cluster>-ray-ports ConfigMap for workers to discover, and each pod’s in-container SSH server is rebound to a probed port. No additional configuration beyond hostNetwork: true is required, and multiple SkyPilot clusters can safely share a node.
For a multi-node cluster, SkyPilot additionally enforces that every pod of the same cluster is placed on a distinct Kubernetes node. This is implemented as a required pod anti-affinity (per-cluster label selector, topology key kubernetes.io/hostname) injected into every hostNetwork pod. One pod per node guarantees each pod has a unique, routable host IP — which is also exactly what lets a hostNetwork cluster span multiple Kubernetes nodes. The selector is scoped per cluster, so pods of different clusters can still co-locate on a node (their cross-cluster port collisions are resolved by the free-port probe described above).
Warning
Because this anti-affinity is a hard scheduling constraint (requiredDuringSchedulingIgnoredDuringExecution), a multi-node hostNetwork cluster needs at least as many schedulable Kubernetes nodes as it has pods. If enough distinct nodes are not available, the cluster fails to schedule with a clear error rather than silently co-locating pods of the same cluster and racing on the shared host network.
Note
The ConfigMap is created in the same namespace as the SkyPilot pods and is owned by the head pod, so it is garbage-collected by Kubernetes on sky down. The SkyPilot service account must be able to create, get, and update ConfigMaps in that namespace (already covered by the minimal permissions).
Note
OCI OKE RoCE clusters (launched with network_tier: best on OCI bare-metal GPU shapes) require host networking to reach the RDMA fabric, so SkyPilot enables it for them automatically — you do not set hostNetwork: true yourself. The same probe and one-pod-per-node behavior described above (including the multi-node node-count requirement in the warning) applies to those clusters.
Observability for administrators#
All SkyPilot tasks are run in pods inside a Kubernetes cluster. As a cluster administrator,
you can inspect running pods (e.g., with kubectl get pods -n namespace) to check which
tasks are running and how many resources they are consuming on the cluster.
Below, we provide tips on how to monitor SkyPilot resources on your Kubernetes cluster.
List SkyPilot resources across all users#
When using the SkyPilot API server, you can use the SkyPilot dashboard to view SkyPilot resources across all users:
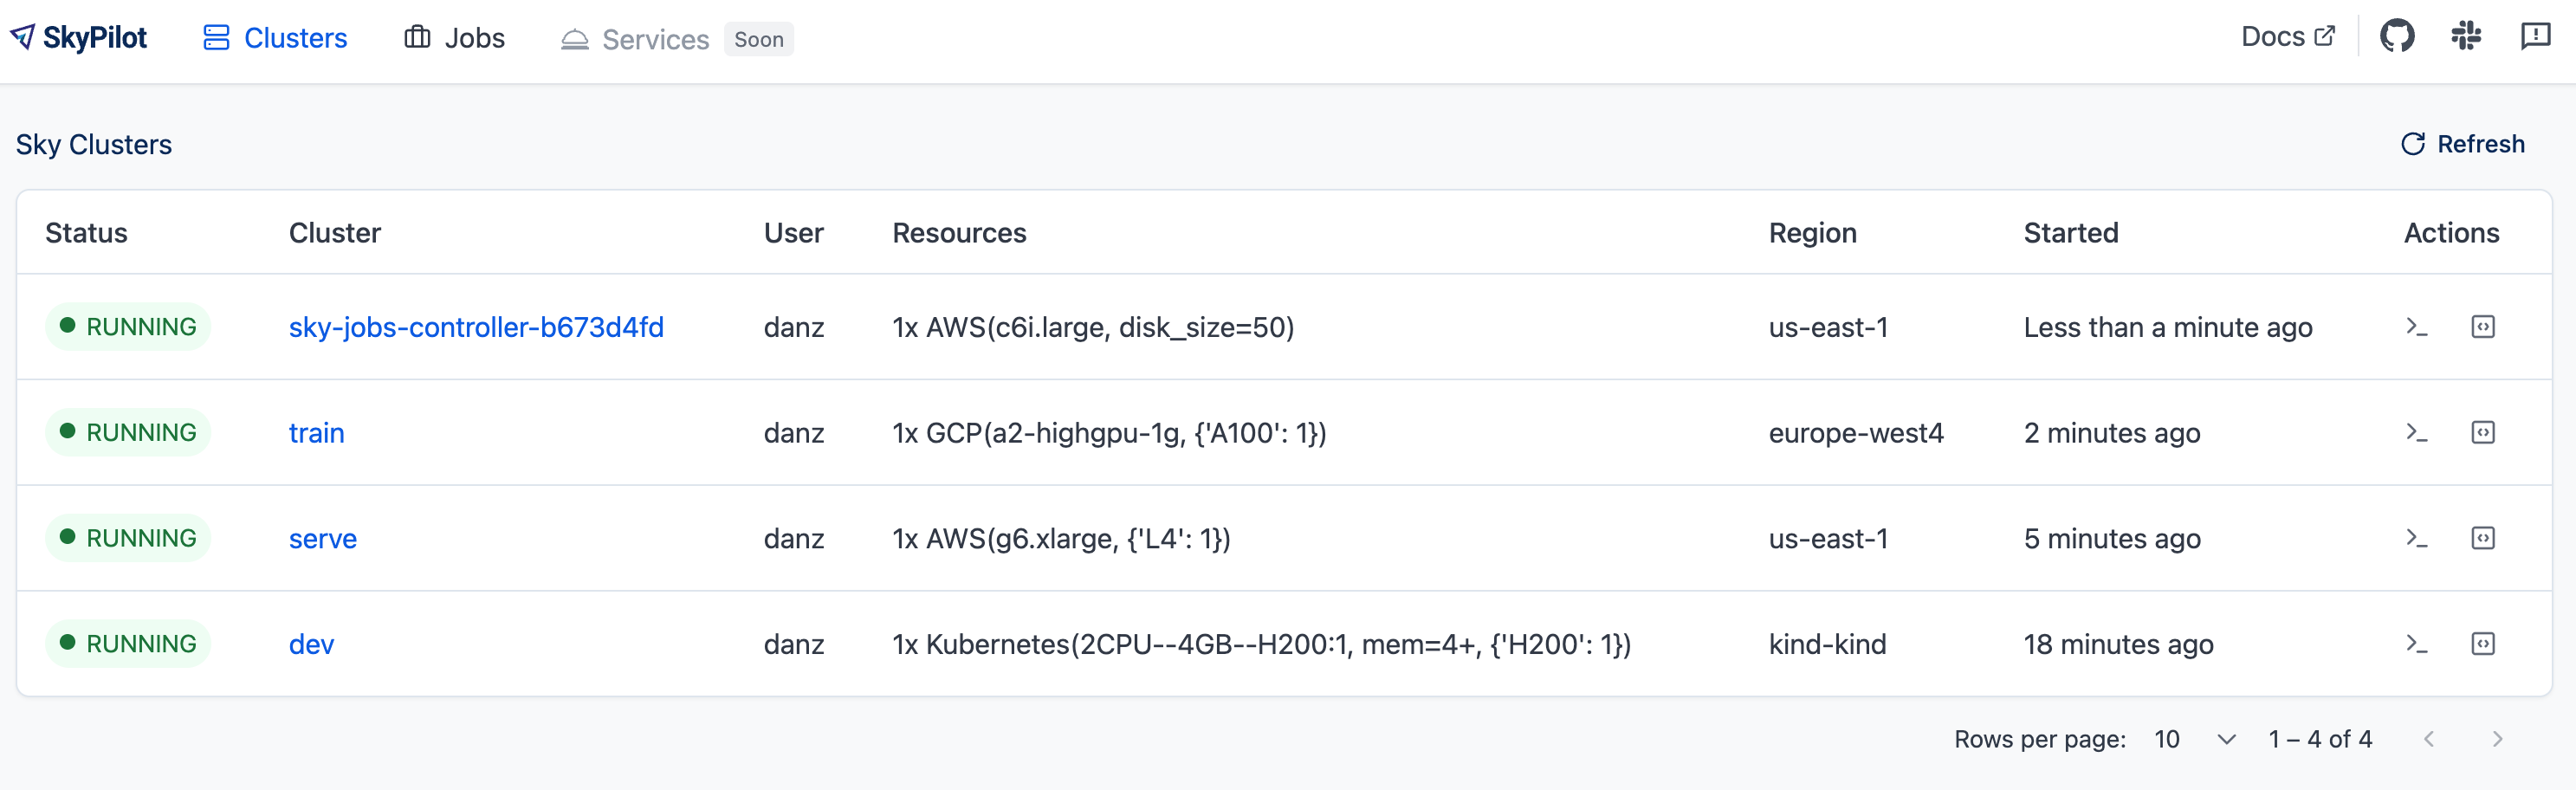
Or run sky status -u:
$ sky status -u
Clusters
NAME                USER               WORKSPACE         INFRA                   RESOURCES                                   STATUS   AUTOSTOP  LAUNCHED
training-multinode  alice@skypilot.co  ml-team           Kubernetes (nebius)     2x(gpus=H100:8, cpus=200, mem=800, ...)     RUNNING  60m       5d ago
dev-alice           alice@skypilot.co  research-private  Kubernetes (coreweave)  1x(gpus=H200:1, cpus=8, mem=32, ...)        RUNNING  -         6d ago
inference           mike@skypilot.co   default           AWS (us-west-2)         1x(gpus=L4:1, g6.2xlarge, ...)              RUNNING  30m       4d ago
dev-bob             bob@skypilot.co    default           GCP (us-west1)          1x(cpus=4, mem=15, n1-standard-4, ...)      STOPPED  -         6d ago
Kubernetes dashboard#
You can deploy tools such as the Kubernetes dashboard to easily view and manage SkyPilot resources on your cluster.
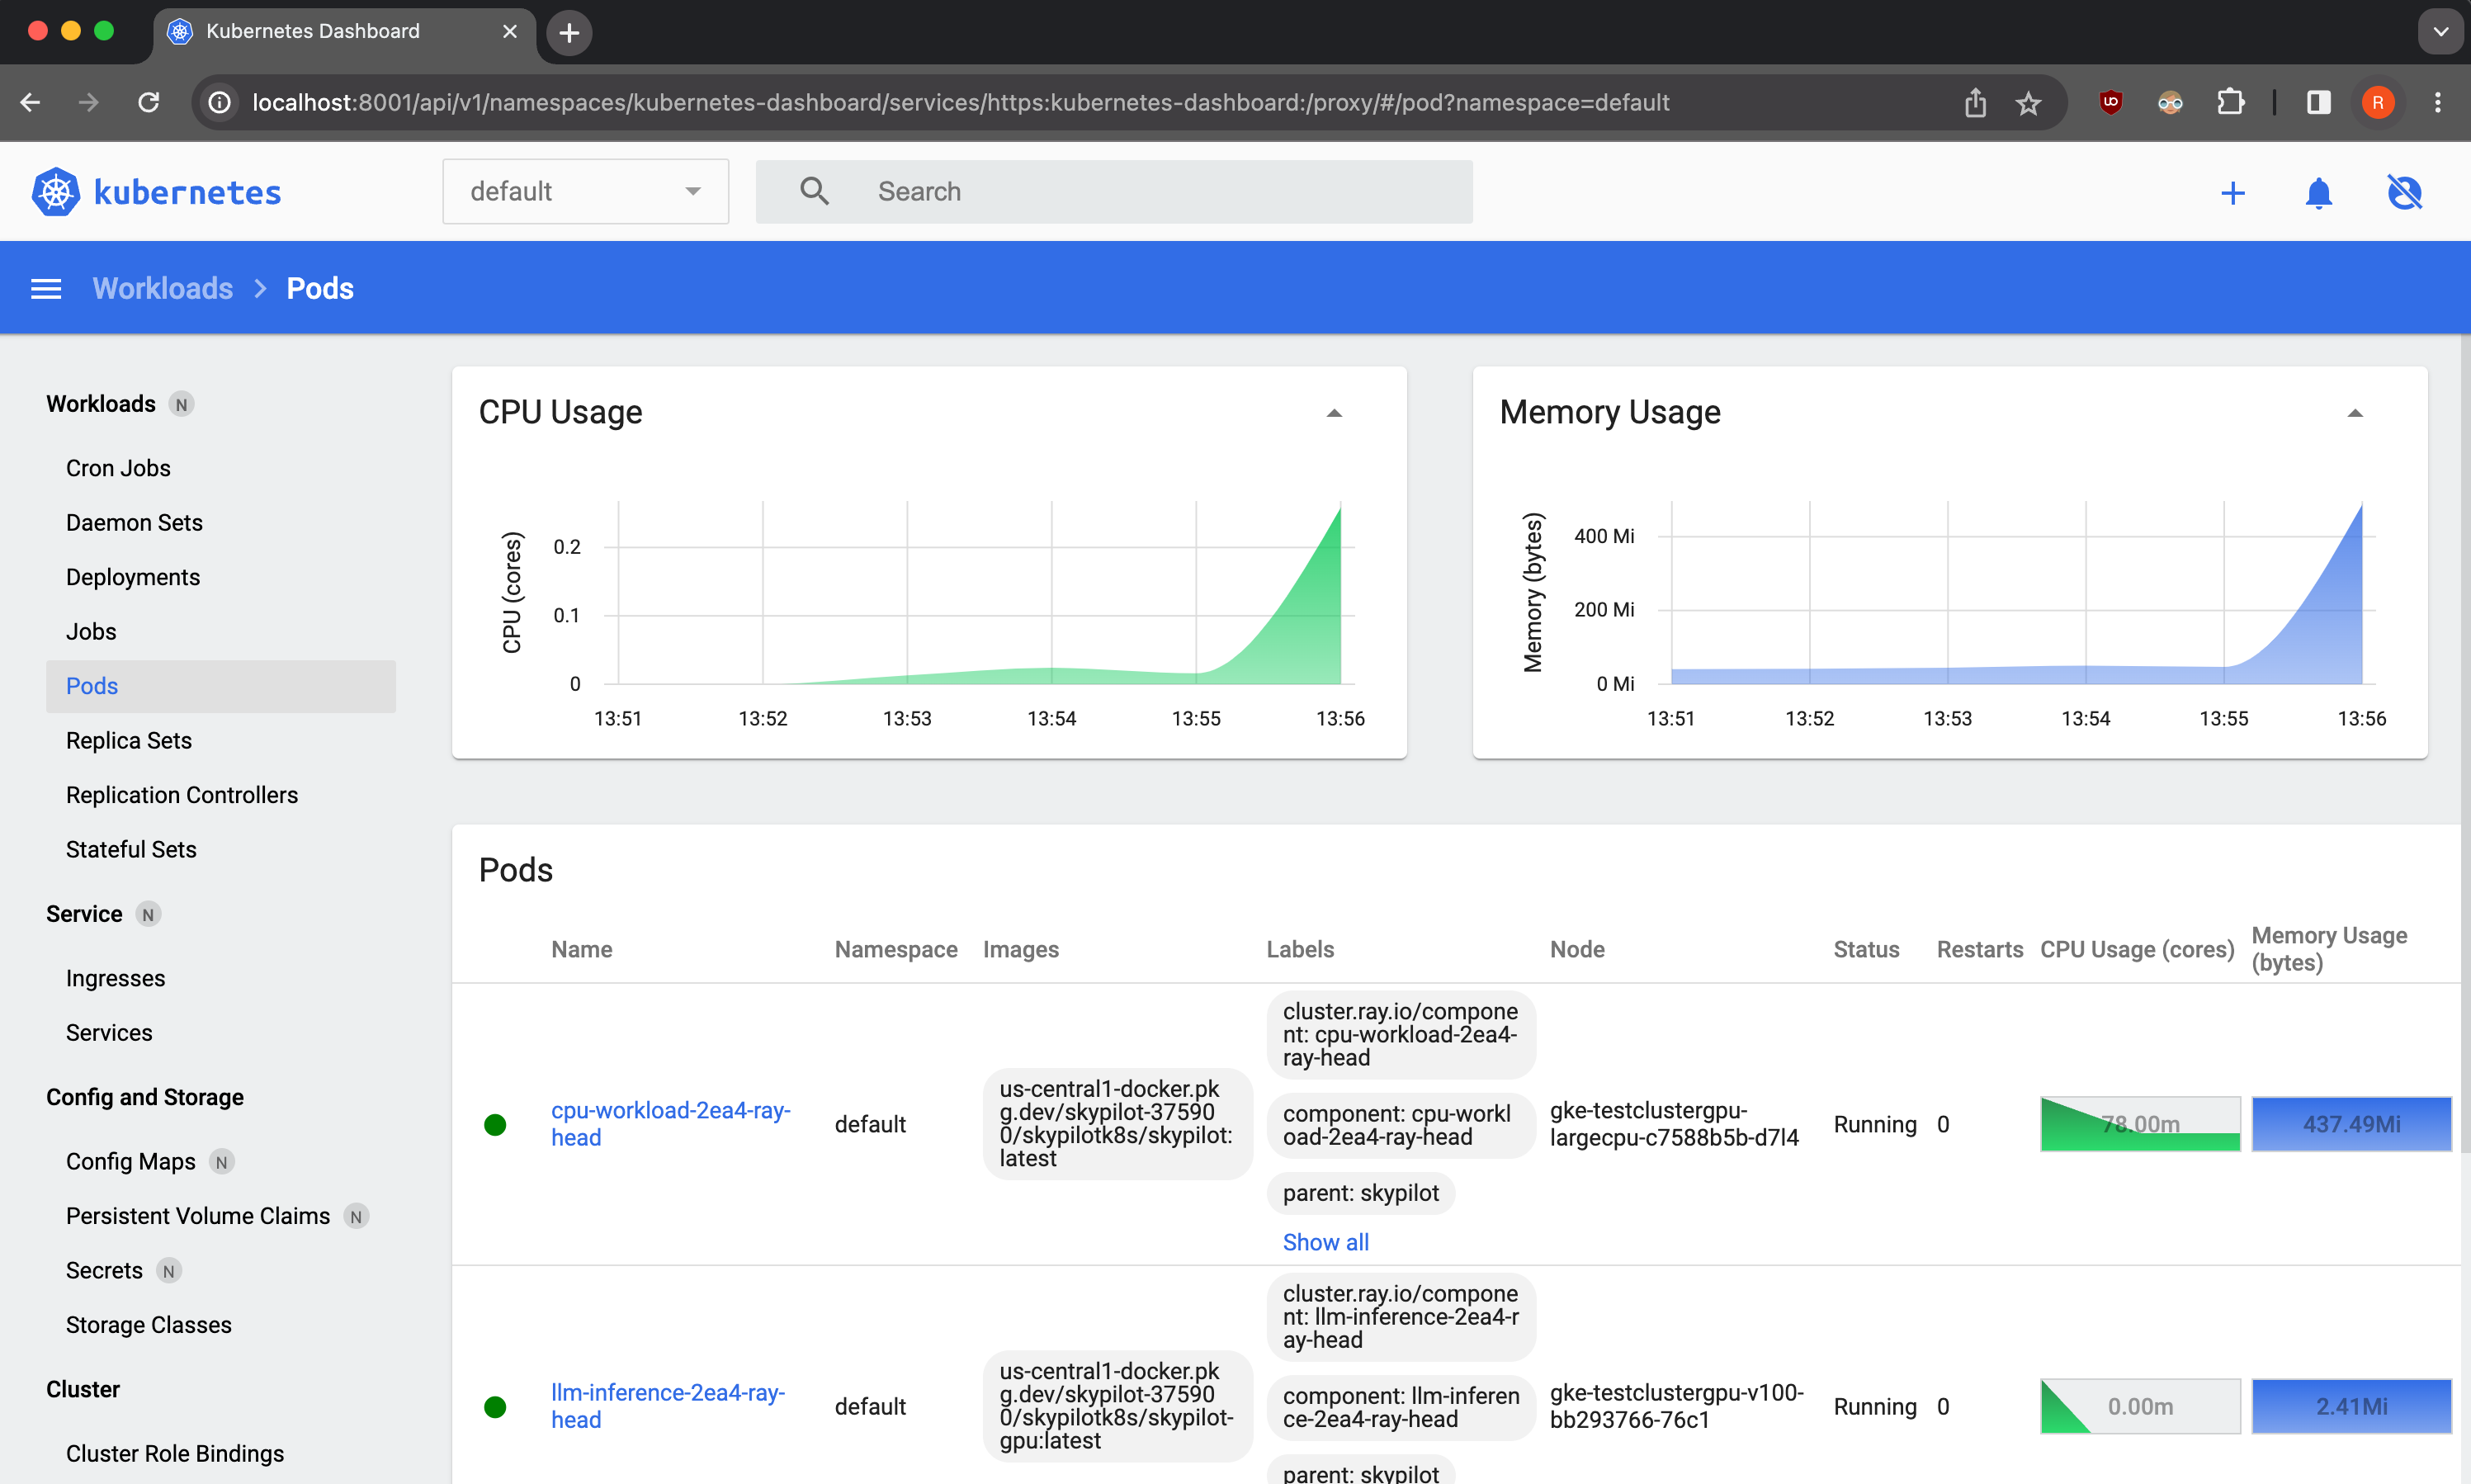
As a demo, we provide a sample Kubernetes dashboard deployment manifest that you can deploy with:
$ kubectl apply -f https://raw.githubusercontent.com/skypilot-org/skypilot/master/tests/kubernetes/scripts/dashboard.yaml
To access the dashboard, run:
$ kubectl proxy
In a browser, open http://localhost:8001/api/v1/namespaces/kubernetes-dashboard/services/https:kubernetes-dashboard:/proxy/ and click on Skip when prompted for credentials.
Note that this dashboard can only be accessed from the machine where the kubectl proxy command is executed.
Note
The demo dashboard is not secure and should not be used in production. Please refer to the Kubernetes documentation for more information on how to set up access control for the dashboard.
Troubleshooting Kubernetes setup#
If you encounter issues while setting up your Kubernetes cluster, please refer to the troubleshooting guide to diagnose and fix issues.