Authentication and RBAC#
SkyPilot API server supports two authentication methods:
Basic auth: Use an admin-configured username and password to authenticate.
SSO (recommended): Use an auth proxy (e.g., OAuth2 Proxy) to authenticate. For example, Okta, Google Workspace, or other SSO providers are supported.
Comparison of the two methods:
Basic Auth |
SSO (recommended) |
|
|---|---|---|
User identity |
Client’s |
User email (e.g., |
SkyPilot RBAC |
Not supported |
Supported |
Setup |
Automatically enabled |
Bring your Okta, Google Workspace, or other SSO provider |
Basic auth#
Basic auth is automatically enabled if you use the helm chart to deploy the API server. See the AUTH_STRING
environment variable in the deployment instructions.
Example login command:
$ sky api login -e http://username:password@<SKYPILOT_API_SERVER_ENDPOINT>
SSO (recommended)#
You can configure the SkyPilot API server to use an SSO providers such as Okta, Google Workspace, or Microsoft Entra ID for authentication.
The SkyPilot implementation is flexible and will also work with most cookie-based browser auth proxies. See User flow and Optional: Bring your own auth proxy for details. To set up Okta, Google Workspace, or Microsoft Entra ID, see Setting up OAuth (Okta, Google Workspace, Microsoft Entra ID, etc).

User flow#
While logging into an API server, SkyPilot will attempt to detect an auth proxy. If detected, the user must log in via a browser:
$ sky api login -e http://<SKYPILOT_API_SERVER_ENDPOINT>
A web browser has been opened at http://<SKYPILOT_API_SERVER_ENDPOINT>/token?local_port=8000. Please continue the login in the web browser.
Login in the browser to authenticate as required by the auth proxy.

After authentication, the CLI will automatically copy the relevant auth cookies from the browser into the CLI.
...
Logged into SkyPilot API server at: http://<SKYPILOT_API_SERVER_ENDPOINT>
└── Dashboard: http://<SKYPILOT_API_SERVER_ENDPOINT>/dashboard
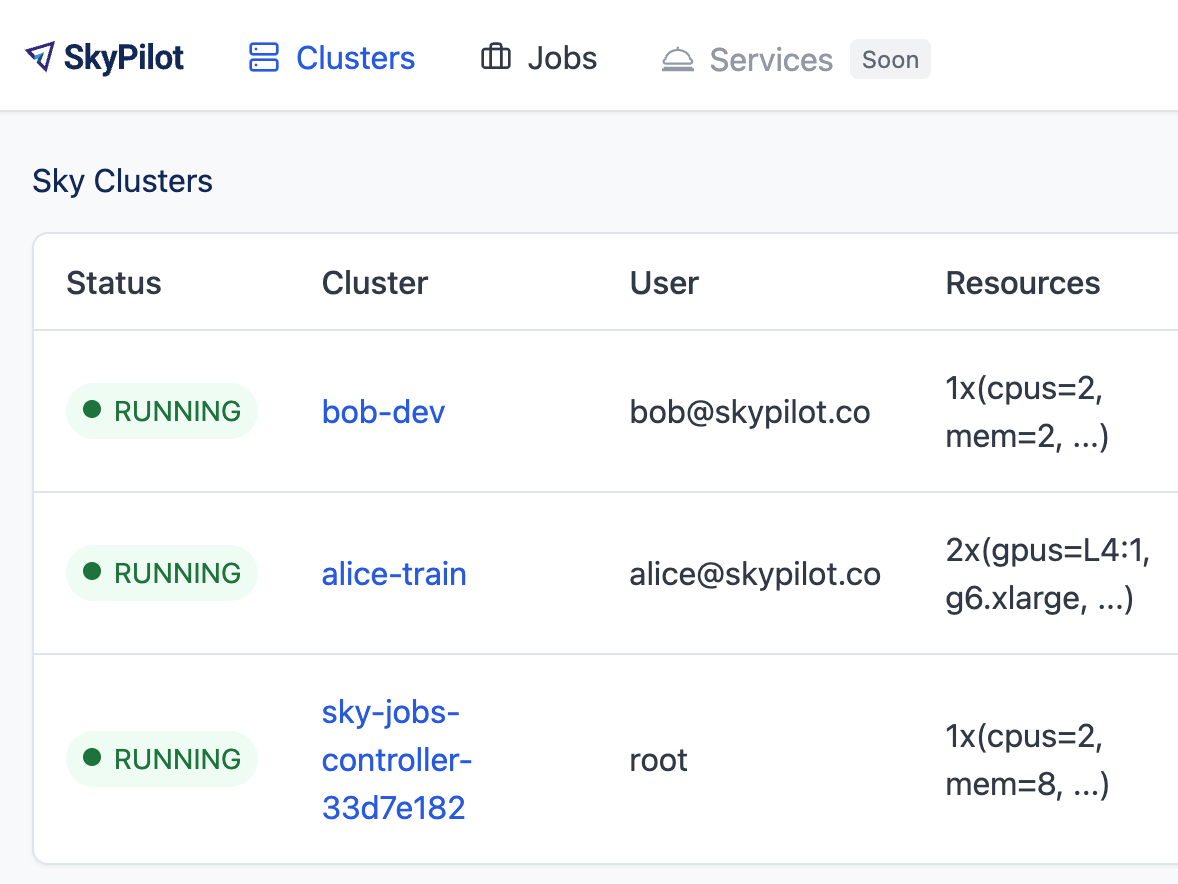
SkyPilot will automatically use the user email from the auth proxy to create a user in the SkyPilot API server.
Setting up OAuth (Okta, Google Workspace, Microsoft Entra ID, etc)#
The SkyPilot API server helm chart provides out-of-the-box support for setting up OAuth on API server. An OAuth2 Proxy will be deployed under the hood and the API server will be configured to use it for authentication.
The instructions below cover Okta, Google Workspace, and Microsoft Entra ID, but any provider compatible with the OIDC spec should work.
Here’s how to set it up:
Set up your auth provider (pick one):
Create application in Okta#
To use Okta, you will need to create a new application in the Okta admin panel.
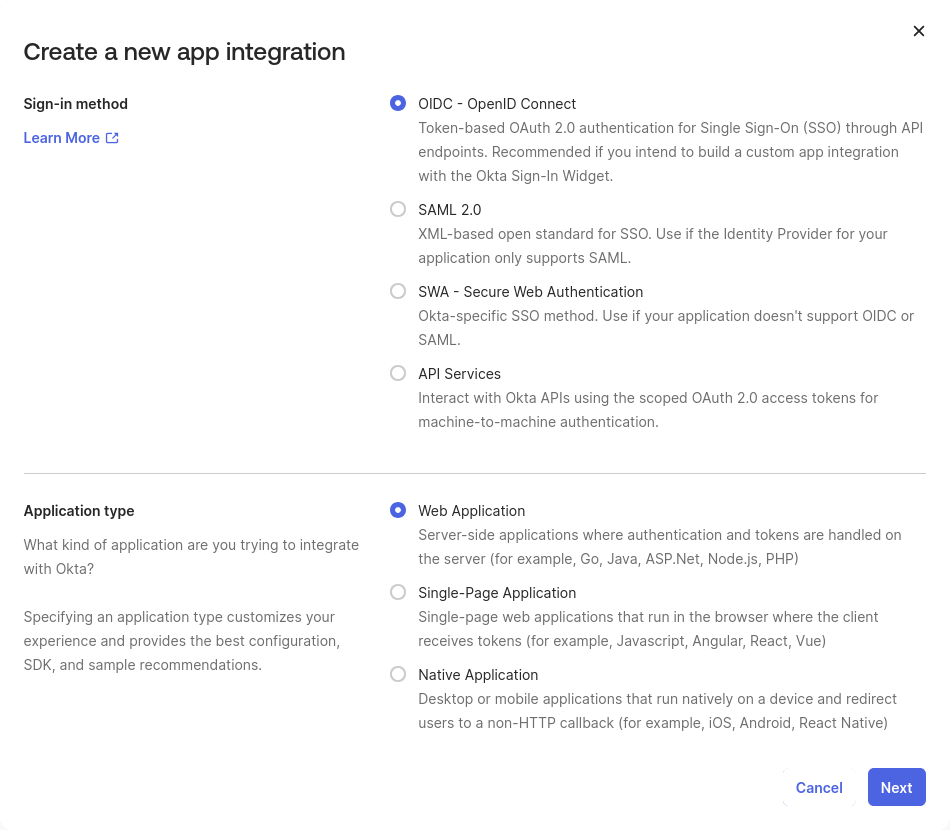
From your Okta admin panel, navigate to Applications > Applications, then click the Create App Integration button.
Sign-in method:
OIDC - OpenID ConnectApplication type:
Web Application
Configure the application:
App integration name:
SkyPilot API Serveror any other name.Sign-in redirect URIs:
<ENDPOINT>/oauth2/callback, where<ENDPOINT>is your API server endpoint. e.g.http://skypilot.example.com/oauth2/callbackAssignments > Controlled access:
Allow everyone in your organization to access, unless you want to limit access to select groups.
Click Save. You will need the Client ID and a Client Secret in the next step.
You can now proceed to the Helm deployment.
Create Google Workspace client in GCP#
To log in with Google Workspace, you will need to create a client in a GCP project.
Each GCP project can contain multiple “clients,” but only a single application configuration. Depending on your use-case, you may want to create a new GCP project for authentication.
Once you have selected a GCP project, go to the Clients page within Google Auth Platform.
Configure Google Auth Platform#
If you have not used Google Auth Platform in this GCP project, you will see a setup screen.
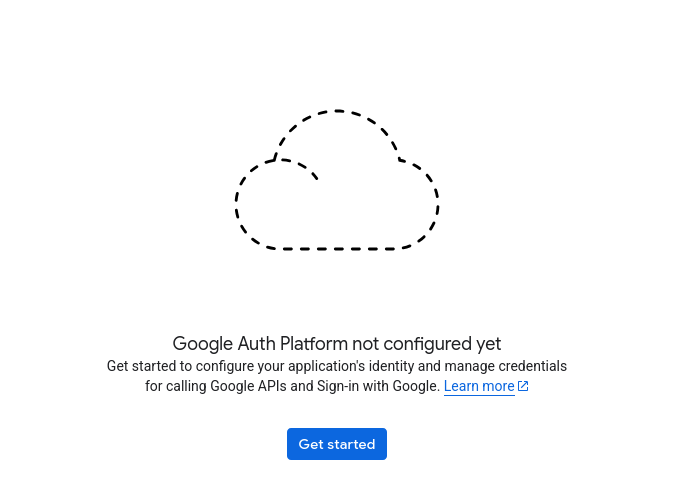
If you see the Clients page rather than this setup screen, you can proceed to the Client setup. Otherwise, click “Get started” to set up the GCP project with Google Auth Platform.
App Information
This configures the display name on the auth prompt for all clients in the GCP project, as well as an email that users can see while logging in. Choose values that make sense for your team.
Audience
Recommended: “Internal”
Choosing “External” may allow users outside your organization to log in, and may require additional verification steps from Google. If you choose “External”, you may want to use the auth proxy email domain filter to prevent users from outside your organization from logging in to SkyPilot.
Contact Information
Provide a good point of contact for your organization.
Finish
Accept the necessary terms and create the configuration.
Create GCP auth client#
Click “Create OAuth client” or visit the Clients page and click “Create”.
Select the necessary config values:
Application type: Choose “Web application”.
Name: Choose a name that will be meaningful to you, such as “SkyPilot auth proxy”. This name is internal-only.
Authorized redirect URIs: Click “Add URI”, and add
<ENDPOINT>/oauth2/callback, where<ENDPOINT>is your API server endpoint. e.g.http://skypilot.example.com/oauth2/callback
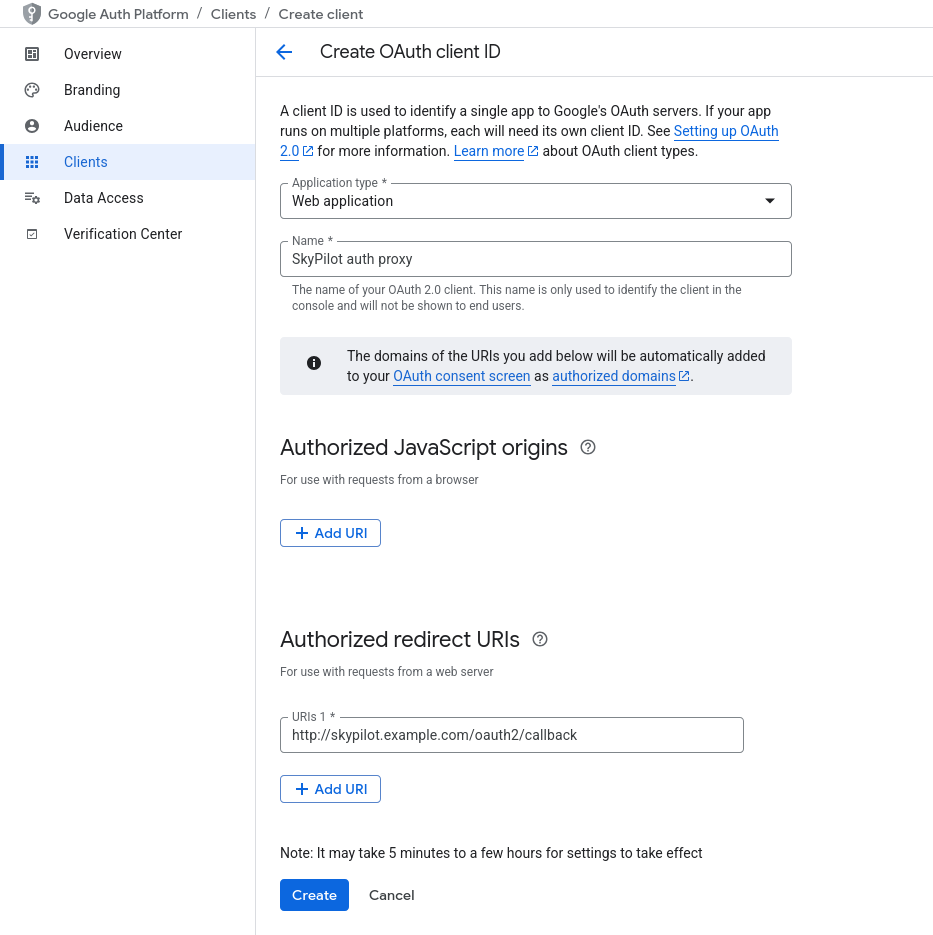
Click “Create”.
Copy down the Client ID and Client secret. After exiting this screen, you won’t be able to access the client secret without creating a new client. You will need them for deploying to Helm.
Note
If Google Auth Platform audience is set to “External” in your GCP project, anyone with a Google account may be able to log in.
You can set an email domain filter in the Helm chart, which is the <EMAIL DOMAIN> value in the Helm deployment instructions below.
To check if your audience is set to “Internal” or “External”, go to the Audience page under Google Auth Platform. Under “User type”, you should see “Internal” or “External”. You can switch between Internal and External audience, but it will affect all auth clients in the GCP project.
Create application in Microsoft Entra ID#
To use Microsoft Entra ID, you will need to add an “App registration” in the Microsoft Entra ID portal.
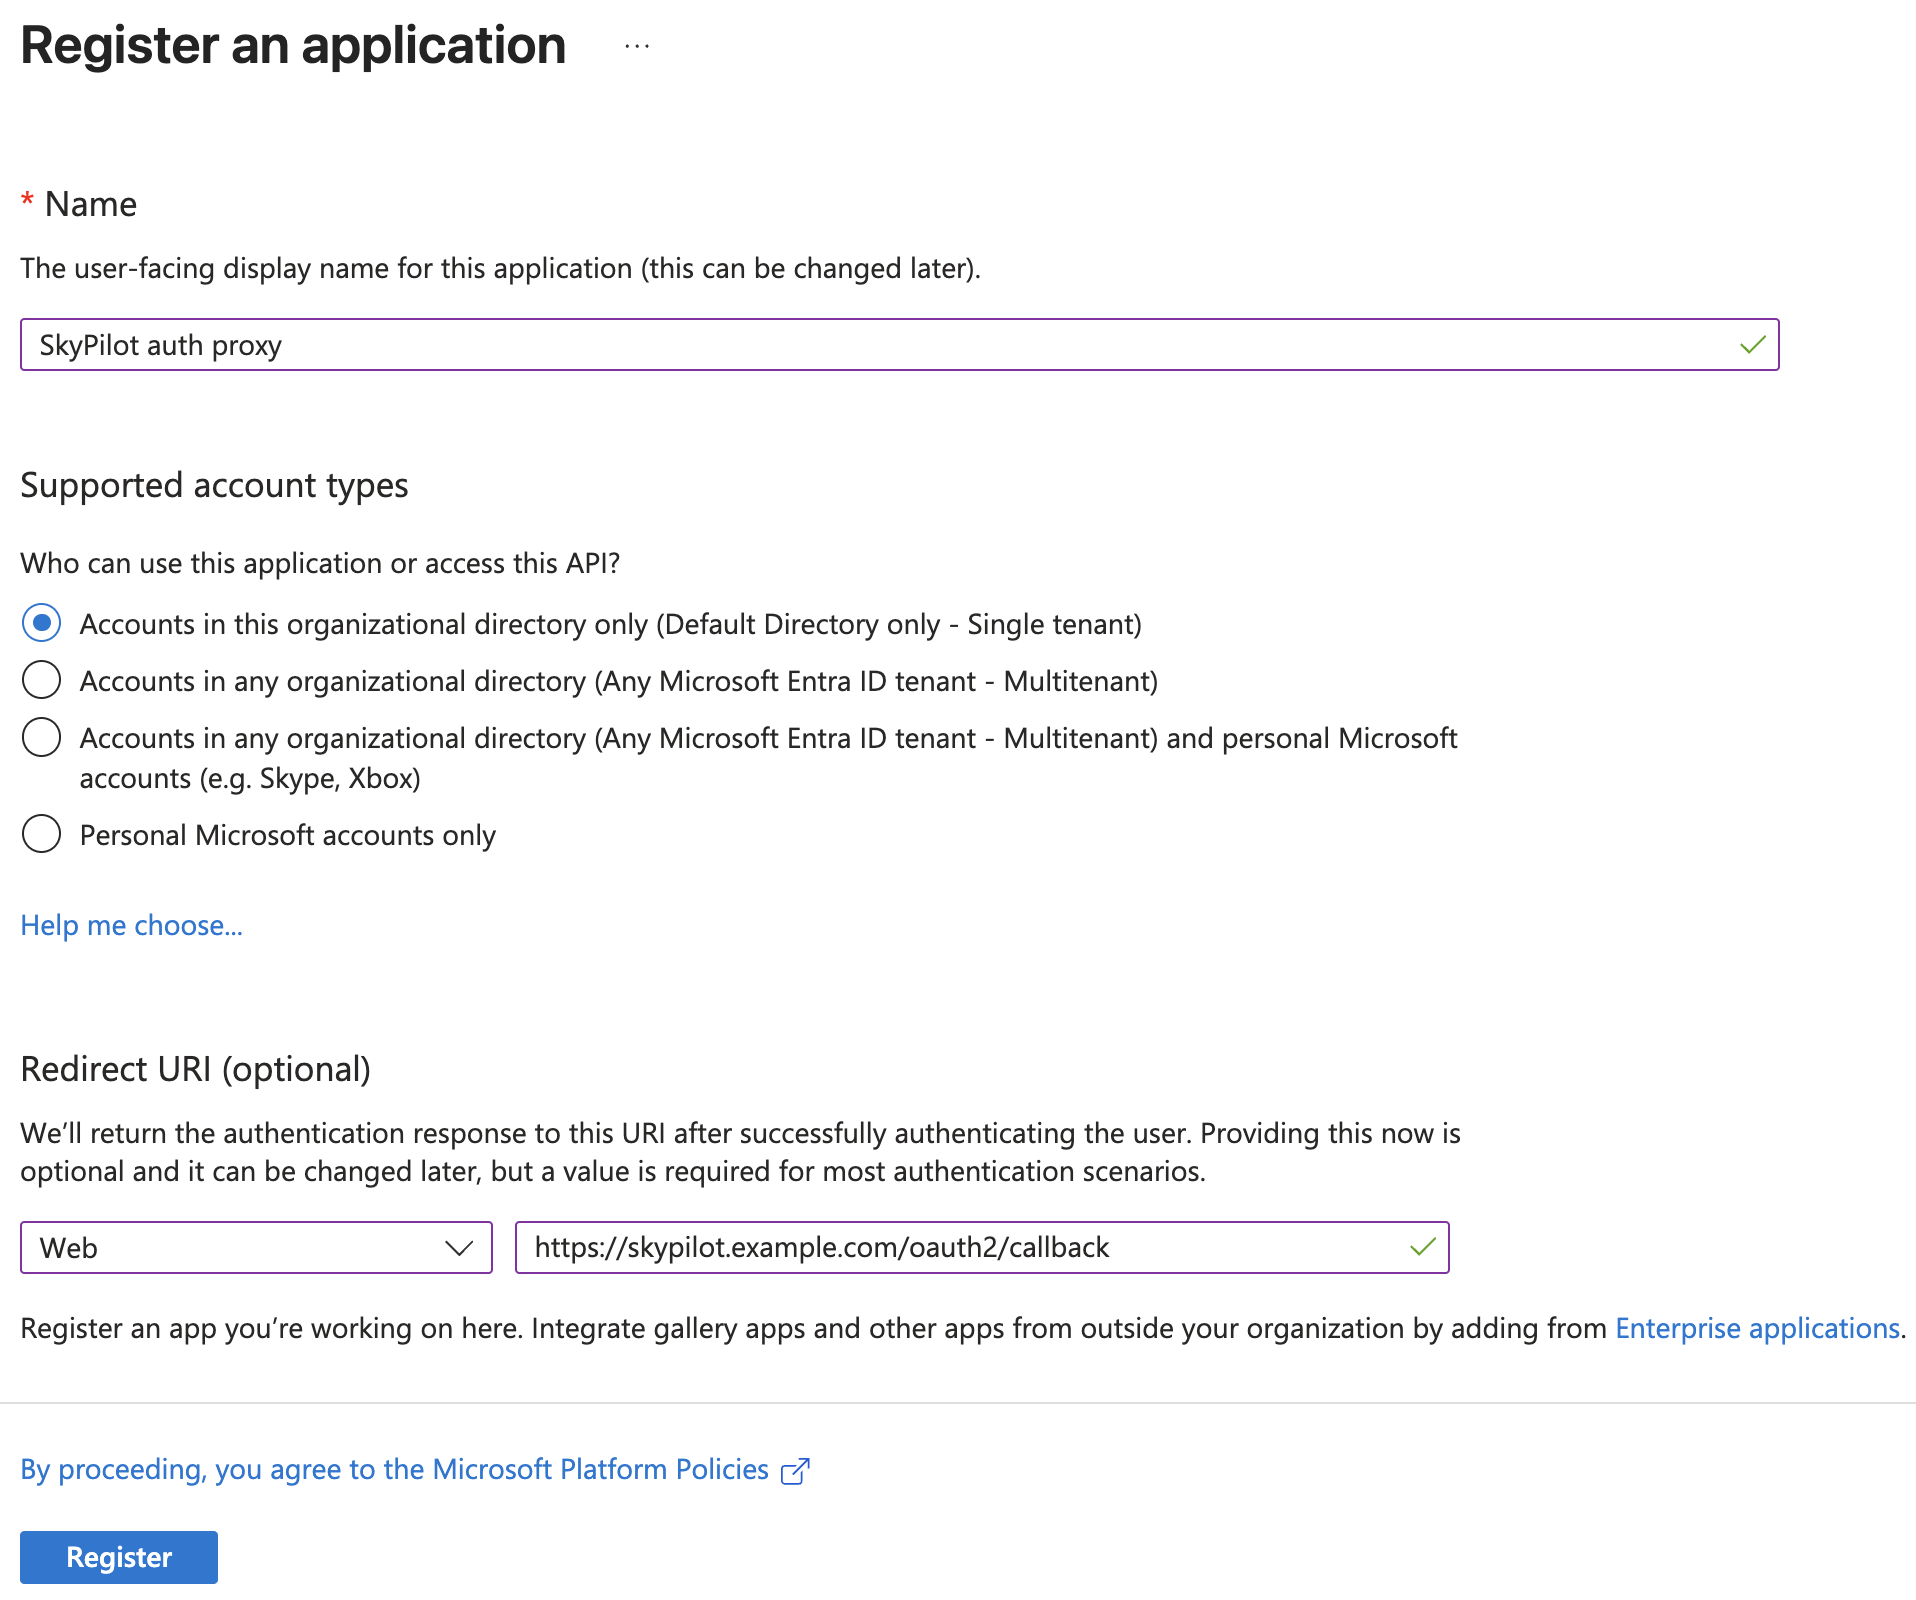
Configure the application:
Name: Choose a name that will be meaningful to you, such as “SkyPilot auth proxy”. This name is internal-only.
Supported account types:
Accounts in this organizational directory only(recommended)Redirect URI:
Select a platform:
WebURI:
<ENDPOINT>/oauth2/callback, where<ENDPOINT>is your API server endpoint. e.g.https://skypilot.example.com/oauth2/callback
Note
Microsoft Entra ID requires HTTPS, so make sure to use
https://rather thanhttp://in your redirect URI.
Click Register. You will need the Client ID (
Application (client) ID) and Tenant ID (Directory (tenant) ID) from the overview page.In the App registrations detail page for the newly created application, click Add a certificate or secret and create a new client secret. You will need the Client Secret in the next step.
Microsoft Entra ID example values.yaml:
auth:
  oauth:
    enabled: true
    oidc-issuer-url: https://login.microsoftonline.com/<TENANT_ID>/v2.0
    client-id: <CLIENT_ID>
    client-secret: <CLIENT_SECRET>
    use-https: true
    email-domain: <YOUR_DOMAIN>  # optional
You can now proceed to the Helm deployment.
Deploy in Helm#
Set up the environment variables for your API server deployment. NAMESPACE and RELEASE_NAME should be set to the currently installed namespace and release:
NAMESPACE=skypilot # TODO: change to your installed namespace
RELEASE_NAME=skypilot # TODO: change to your installed release name
Use helm upgrade to redeploy the API server helm chart with the skypilot-oauth2-proxy deployment. Replace the config values:
<CLIENT ID>: Copy from the auth provider dashboard<CLIENT SECRET>: Copy from the auth provider dashboard<ISSUER URL>Okta: Your Okta login URL, like
https://acme-corp.okta.comGoogle Workspace: Set to
https://accounts.google.comMicrosoft Entra ID: Set to
https://login.microsoftonline.com/<TENANT_ID>/v2.0, where<TENANT_ID>is your Microsoft Entra ID tenant ID
<EMAIL DOMAIN>: Optionally restrict login to specific email domains
$ # --reuse-values is critical to keep the old values that aren't being updated here.
$ helm upgrade -n $NAMESPACE $RELEASE_NAME skypilot/skypilot-nightly --devel --reuse-values \
  --set auth.oauth.enabled=true \
  --set auth.oauth.oidc-issuer-url=https://<ISSUER URL> \
  --set auth.oauth.client-id=<CLIENT ID> \
  --set auth.oauth.client-secret=<CLIENT SECRET> \
  --set auth.oauth.email-domain=<EMAIL DOMAIN> # optional
If you are using Microsoft Entra ID or any other provider that requires the redirect URI to be HTTPS, you will need to set one additional Helm value:
$ helm upgrade -n $NAMESPACE $RELEASE_NAME skypilot/skypilot-nightly --devel --reuse-values \
  --set auth.oauth.use-https=true
For better security, you can also store the client details in a Kubernetes secret instead of passing them as Helm values:
$ # Create a secret with your OIDC credentials
$ kubectl create secret generic oauth2-proxy-credentials -n $NAMESPACE \
  --from-literal=client-id=<CLIENT ID> \
  --from-literal=client-secret=<CLIENT SECRET>

$ # Deploy using the secret
$ helm upgrade -n $NAMESPACE $RELEASE_NAME skypilot/skypilot-nightly --devel --reuse-values \
  --set auth.oauth.enabled=true \
  --set auth.oauth.oidc-issuer-url=https://<ISSUER URL> \
  --set auth.oauth.client-details-from-secret=oauth2-proxy-credentials \
  --set auth.oauth.email-domain=<EMAIL DOMAIN> # optional
Note
Both client-id/client-secret (dash format) and client_id/client_secret (underscore format) key names in secrets are supported. The system will automatically detect which format is present in your secret. This provides compatibility with different secret management systems - for example, HashiCorp Vault requires underscores in key names.
To make sure it’s working, visit your endpoint URL in a browser. You should be redirected to your auth provider to sign in.
Now, you can use sky api login -e <ENDPOINT> to go though the login flow for the CLI.
OAuth migration guide#
Migration guide for auth proxy based authentication (before SkyPilot v0.10.2)
Starting with SkyPilot v0.10.2, the API server supports built-in OAuth2 integration (delegate authentication to OAuth2 Proxy under the hood) without ingress support. This is more flexible and can work seamlessly with other authentication schemes supported by the API server.
If you are using the auth proxy in ingress (enabled by setting ingress.oauth2-proxy.enabled=true in the Helm chart), you can migrate to the new OAuth2 integration by setting auth.oauth.enabled=true and migrate other settings from ingress.oauth2-proxy.* to auth.oauth.* in the Helm chart:
Note
Both the API server docker image and the helm chart should be updated to version 0.10.2 or later to use the new OAuth2 integration.
# NAMESPACE and RELEASE_NAME are the same as the ones used in the Helm deployment
$ helm get values $RELEASE_NAME -n $NAMESPACE -o yaml > values.yaml

# Edit values.yaml, move the values from ingress.oauth2-proxy.* to auth.oauth.*
# Preview the changes, you should see the following diff:
$ diff values.yaml <(sed 's/^ingress:/auth:/;s/^  oauth2-proxy:/  oauth:/' values.yaml)
4,5c4,5
< ingress:
<   oauth2-proxy:
---
> auth:
>   oauth:
$ sed -i 's/^ingress:/auth:/;s/^  oauth2-proxy:/  oauth:/' values.yaml

# Upgrade the helm chart with mutated values
$ helm upgrade -n $NAMESPACE $RELEASE_NAME skypilot/skypilot-nightly --devel --reset-then-reuse-values \
  -f values.yaml
The migration will not break authenticated clients as long as the OAuth provider config is not changed.
Auth integration FAQ#
[Okta] I’m getting a 400 Bad Request error from Okta when I open the endpoint URL in a browser.
Your proxy may be configured to redirect to a different URL (e.g., changing the URL from
httptohttps). Make sure to set theSign-in redirect URIsin Okta application settings to all possible URLs that your proxy may redirect to, including HTTP and HTTPS endpoints.
Optional: Service accounts#
You can also use service accounts to access SkyPilot API server programmatically without browser authentication, which is good for CI/CD pipelines, Airflow integration, etc.
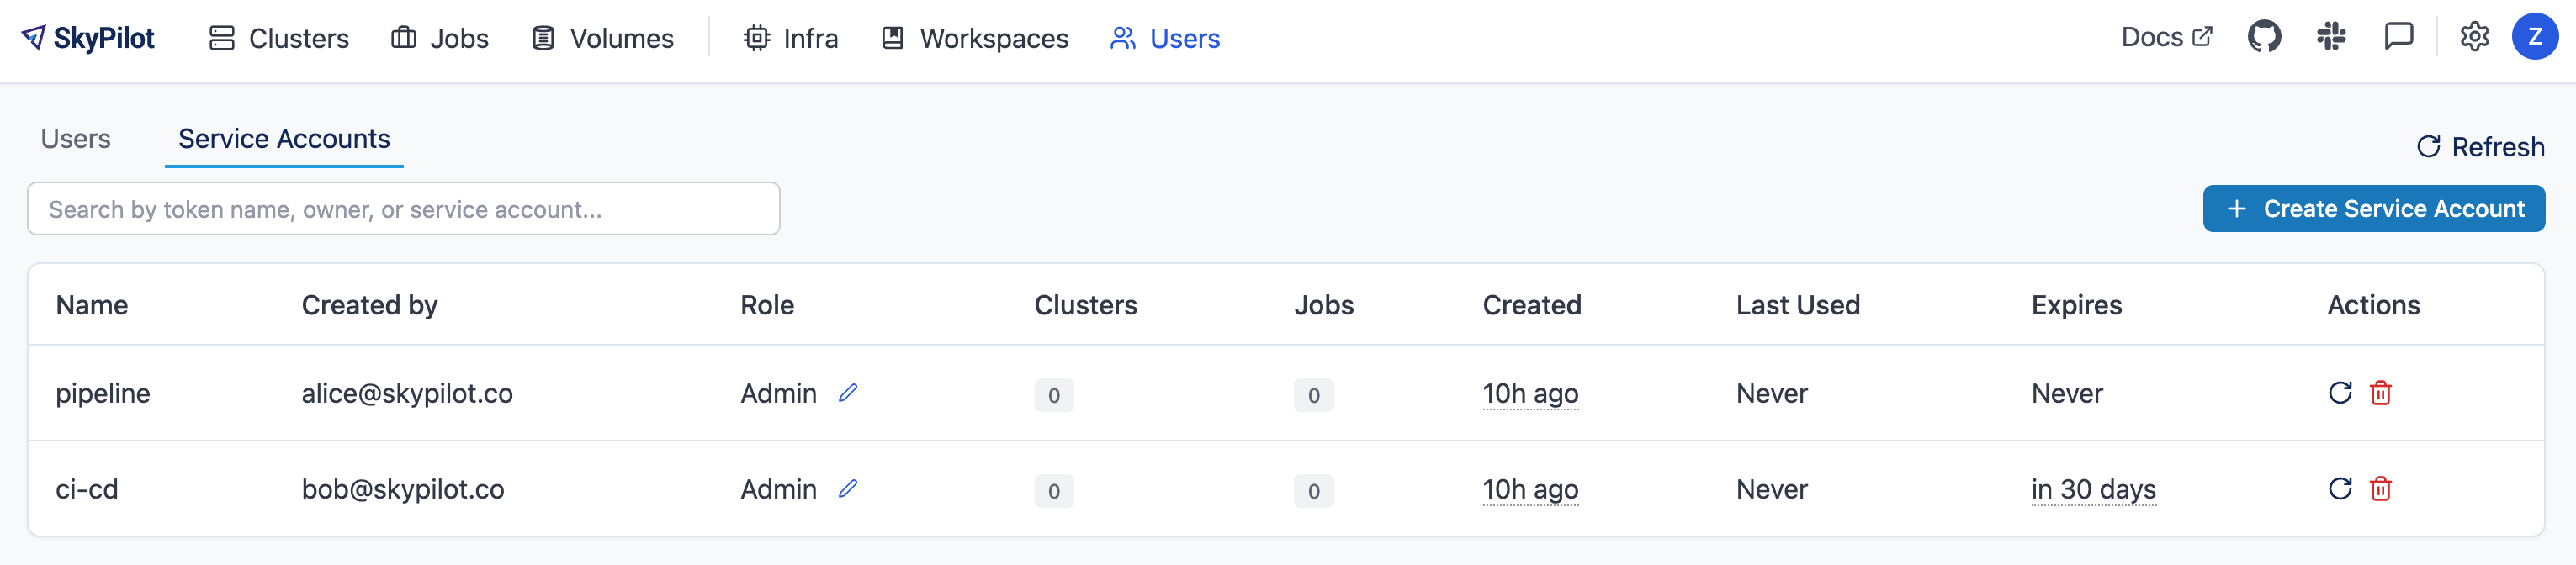
Creating service accounts#
Navigate to Users > Service Accounts in the SkyPilot dashboard
Click Create Service Account and provide:
Token Name: Descriptive name (e.g., “pipeline”)
Expiration: Optional (defaults to 30 days)
Save the token immediately - it won’t be shown again
Assign appropriate role (admin/user)
Accessing the API server#
Authenticate with the service account token:
$ sky api login -e <ENDPOINT> --token <SERVICE_ACCOUNT_TOKEN>
Or, use the SKYPILOT_SERVICE_ACCOUNT_TOKEN environment variable:
$ export SKYPILOT_SERVICE_ACCOUNT_TOKEN=<SERVICE_ACCOUNT_TOKEN>
$ sky api info
Example: GitHub actions (CI/CD)#
# .github/workflows/deploy.yml
- name: Configure SkyPilot
  run: sky api login -e ${{ vars.SKYPILOT_API_ENDPOINT }} --token ${{ secrets.SKYPILOT_SERVICE_ACCOUNT_TOKEN }}

- name: Launch training job
  run: sky launch training.yaml
Service account architecture#

Service accounts are enabled by default in the SkyPilot API server helm chart. To disable them, set --set apiService.enableServiceAccounts=false in the helm upgrade command.
Optional: Bring your own auth proxy#
Under the hood, SkyPilot uses cookies just like a browser to authenticate to an auth proxy. This means that most web authentication proxies should work with the SkyPilot API server. This can be convenient if you already have a standardized auth proxy setup for services you deploy.
To bring your own auth proxy, just configure it in front of the underlying SkyPilot API server, just like any other web application. Then, use the proxy’s address as the API server endpoint.
To log into the CLI, use sky api login as normal - it should automatically detect the auth proxy and redirect you into the special login flow.
During the login flow, the token provided by the web login will encode the cookies used for authentication. By pasting this into the CLI, the CLI will also be able to authenticate using the cookies.

Note
If your auth proxy is not automatically detected or you would like to login with a different identity, try using sky api login --relogin to force relogin.
If the X-Auth-Request-Email header is set by your auth proxy, SkyPilot will use it as the username in all requests. You can customize the authentication header name if your auth proxy uses a different header than the default X-Auth-Request-Email.
# Using Helm chart values
helm upgrade --install $RELEASE_NAME skypilot/skypilot-nightly --devel \
  --namespace $NAMESPACE \
  --reuse-values \
  --set apiService.authUserHeaderName=X-Custom-User-Header
# Using environment variable - not necessary if using Helm
export SKYPILOT_AUTH_USER_HEADER=X-Custom-User-Header
sky api start --deploy
Optional: Cloudflare Zero Trust and WARP#
You can configure Cloudflare Zero Trust with WARP to provide seamless authentication for your SkyPilot API server. This setup allows CLI/API requests to bypass login when the device is connected to Warp, while browser users are still challenged with SSO.
Prerequisites#
A domain managed by Cloudflare (e.g.
skypilot.org)Cloudflare Zero Trust subscription
DNS record pointing your API ingress LoadBalancer IP from the SSO setup in the same Cloudflare account as your Zero Trust setup (this example uses
zerotrust.skypilot.org)SkyPilot API server configured with SSO (you will need your client ID and secret)
Step 1: Create policies#
Navigate to Zero Trust → Access → Policies → Add a policy
Policy 1: allow-<yourorg>
Action:
AllowInclude:
Selector:
Emails ending inValue:
@<yourorg>.com
Policy 2: bypass-warp
Action:
BypassInclude:
Selector:
WarpValue:
Warp
Step 2: Configure your SSO provider as an identity provider#
Navigate to Zero Trust → Settings → Authentication → Login methods → Add new
Configure the identity provider in Cloudflare:
App ID:
<SSO_CLIENT_ID>Client secret:
<SSO_CLIENT_SECRET>
Add Cloudflare Authorized JavaScript origins and redirect URIs to your SSO client:
Authorized JavaScript origins:
https://<your-team-name>.cloudflareaccess.comRedirect URIs:
https://<your-team-name>.cloudflareaccess.com/cdn-cgi/access/callback
Note
You can find your team name under Zero Trust → Settings → Custom Pages → Team Domain.
It will be listed as <your-team-name>.cloudflareaccess.com.
Step 3: Create a Cloudflare access application#
Navigate to Zero Trust → Access → Applications → Add an application
Configure the application:
Application type:
Self-hostedApplication name:
SkyPilot APISession duration:
24 hoursPublic hostname:
Subdomain:
DNS_RECORD_NAME(e.g.zerotrust)Domain:
DNS_RECORD_DOMAIN(e.g.skypilot.org)
Access policies → Select existing policies:
Allow policy:
allow-<yourorg>Bypass policy:
bypass-warp
Save the application.
This configuration allows:
CLI/API requests to bypass login if the device is on WARP
Browser users to be challenged with SSO
Step 4: Enable device enrollment for WARP#
Navigate to Zero Trust → Settings → WARP client → Device enrollment permissions → Manage
Create an enrollment rule:
Select existing policies:
allow-<yourorg>
Save
This restricts WARP enrollment to only your team members.
Step 5: Deploy WARP client to your team#
You you deploy the WARP client to your team in one of two ways:
Manual deployment (Cloudflare WARP client manual deployment)
Automatic deployment (Cloudflare WARP client MDM deployment)
Each user performs this setup once per device.
Step 6: Test access#
Test that the configuration is working:
# Set your DNS record variables
$ DNS_RECORD_NAME=<your_dns_record_name>  # e.g. zerotrust
$ DNS_RECORD_DOMAIN=<your_dns_record_domain>  # e.g. skypilot.org

# Test the API health endpoint
$ curl -i https://${DNS_RECORD_NAME}.${DNS_RECORD_DOMAIN}/api/health
# Should return 200 OK

# Test SkyPilot API login
$ sky api login -e https://${DNS_RECORD_NAME}.${DNS_RECORD_DOMAIN}
# Should complete login without browser redirect
SkyPilot RBAC#
SkyPilot provides basic RBAC (role-based access control) support. Two roles are supported:
User: Use SkyPilot as usual to launch and manage resources (clusters, jobs, etc.).
Admin: Manage SkyPilot API server settings, users, and workspaces.
RBAC support is enabled only when SSO authentication is used (not when using basic auth).
Config rbac.default_role determines whether a new
SkyPilot user is created with the user or admin role. By default, it is
set to admin to ease first-time setup.
User management#
SkyPilot automatically creates a user for each authenticated user. The user’s email is used as the username.
Admins can click on the Users tab in the SkyPilot dashboard to manage users and their roles.
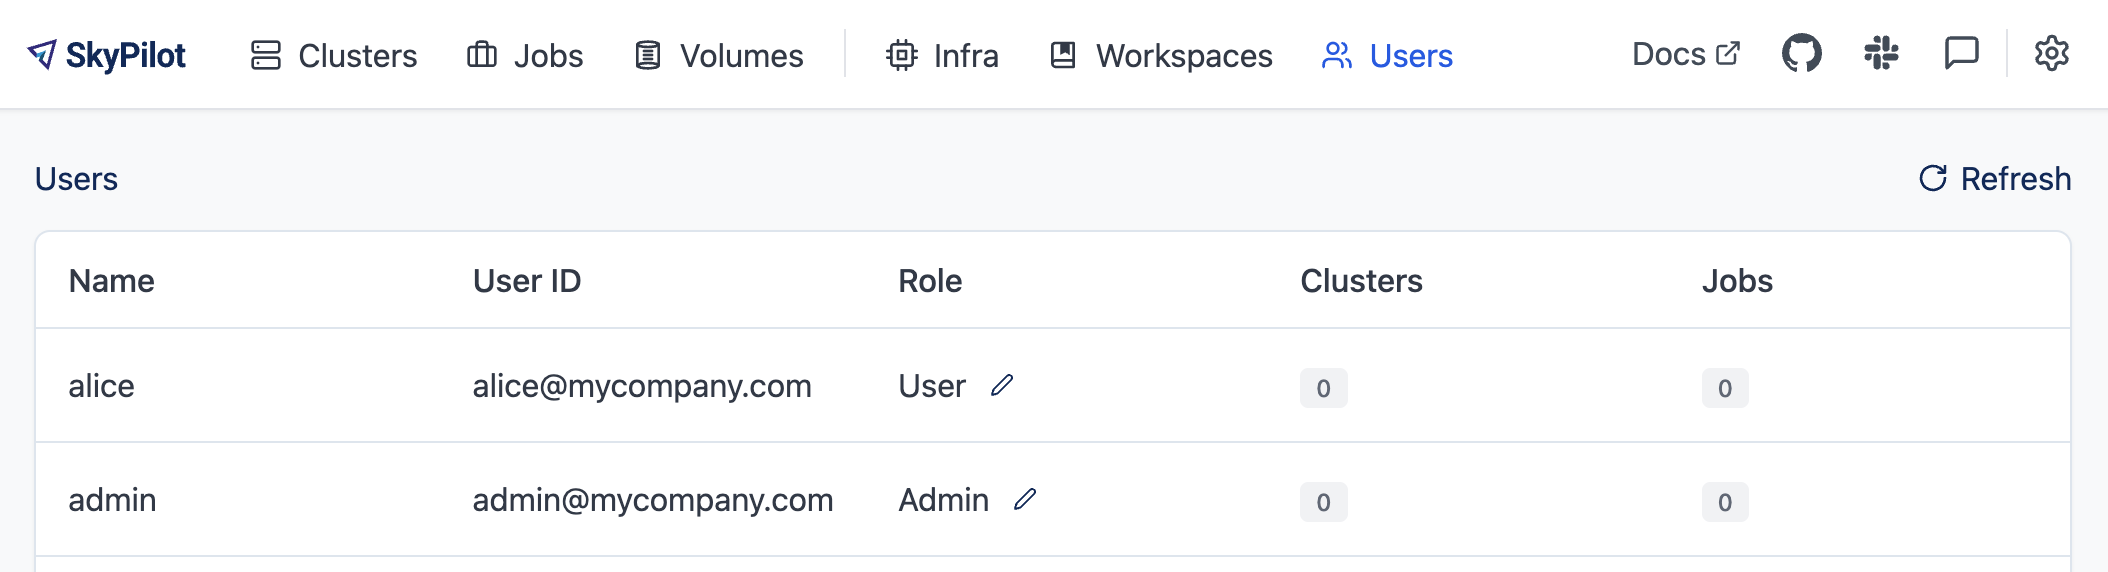
Supported operations:
Adminrole can update the role for all users, and delete users.Userrole can view all users and their roles.