Deploying a SkyPilot API Server on GKE with Okta and Nebius#
In this example, we will deploy a SkyPilot API server on a GKE cluster with Okta for authentication.
Infra choices configured in this guide (pick any combination or all):
GCP VMs
Nebius VMs
GKE Kubernetes cluster
Nebius Managed Kubernetes cluster
More infra choices (AWS, Lambda Cloud, RunPod, SSH Node Pools, and more) are covered in the admin deployment docs.

SkyPilot login with Okta#

SkyPilot dashboard with running clusters#
Prerequisites#
Okta with SkyPilot API server configured as OIDC App (see auth proxy docs)
GCP credentials with access to a GKE cluster and permissions to create VMs (GCP service account with json key)
Nebius credentials (Nebius service account with json key)
An existing Nebius Managed Kubernetes cluster
Nvidia GPU Operator and Nvidia Device Plugin must be installed on the cluster (Nebius Console -> Applications -> Nvidia {GPU Operator, Device Plugin} -> Deploy)
Step 1: Collect cloud credentials and variables#
Set up the following variables by replacing the values with your own. These variables will be used throughout the guide:
# Namespace to deploy the API server in and the name of the helm release (can be any string)
NAMESPACE=skypilot
RELEASE_NAME=skypilot

# Okta variables - from Okta console -> Applications -> <SkyPilot App> -> Client ID and Client Secret
OKTA_CLIENT_ID=<okta_client_id>
OKTA_CLIENT_SECRET=<okta_client_secret>
OKTA_ISSUER_URL=<okta_issuer_url> # E.g., https://myorg.okta.com

# GCP variables
GCP_PROJECT_ID=<your_gcp_project_id> # E.g., my-project
GCP_SERVICE_ACCOUNT_JSON=<your_gcp_service_account_json_path> # E.g., $PWD/gcp-service-account.json

# GKE variables. This is the cluster that will host the API server.
GKE_CLUSTER_NAME=<gke_cluster_name> # E.g., mycluster
GKE_ZONE=<gke_zone> # E.g., us-central1

# Nebius variables. This is the external k8s cluster with GPUs.
NEBIUS_CLUSTER_ID=<nebius_cluster_id> # Starts with mk8scluster-; different from cluster name. Can be found in Nebius console.
NEBIUS_TENANT_ID=$(nebius iam tenant list --format json | jq -r '.items[0].metadata.id') # Also available in Nebius console, e.g., abc-123-...
NEBIUS_SERVICE_ACCOUNT_JSON=<your_nebius_service_account_json_path> # E.g., $PWD/nebius-credentials.json

# Temp variables used in the guide, no need to change
TMP_KUBECONFIG=/tmp/sky_kubeconfig
Prepare GCP credentials#
Create a secret with the GCP service account json key:
rm -f $TMP_KUBECONFIG # Remove the file if it exists

# Get GKE credentials
KUBECONFIG=$TMP_KUBECONFIG gcloud container clusters get-credentials $GKE_CLUSTER_NAME --zone $GKE_ZONE
GKE_CONTEXT=$(kubectl config current-context --kubeconfig $TMP_KUBECONFIG)

kubectl create namespace $NAMESPACE --kubeconfig $TMP_KUBECONFIG
kubectl create secret generic gcp-credentials --kubeconfig $TMP_KUBECONFIG --context $GKE_CONTEXT \
  --namespace $NAMESPACE \
  --from-file=gcp-cred.json=$GCP_SERVICE_ACCOUNT_JSON
Prepare Nebius credentials#
Create a secret with the Nebius service account json key:
# Set up Nebius credentials for Nebius CLI auth
kubectl create secret generic nebius-credentials \
  --namespace $NAMESPACE \
  --from-file=credentials.json=$NEBIUS_SERVICE_ACCOUNT_JSON
Prepare Kubernetes credentials: Nebius managed Kubernetes and GKE#
Combine Nebius and GKE credentials into a single kubeconfig and create a secret with the combined kubeconfig:
# Get Nebius credentials
nebius mk8s cluster get-credentials --id $NEBIUS_CLUSTER_ID --external --kubeconfig $TMP_KUBECONFIG
NEBIUS_CONTEXT=$(kubectl config current-context --kubeconfig $TMP_KUBECONFIG)

# To help SkyPilot identify GPUs on the Nebius cluster, label the nodes with the GPU type. If you already installed the Nvidia Device Plugin, this step will be automatically skipped.
KUBECONFIG=$TMP_KUBECONFIG python -m sky.utils.kubernetes.gpu_labeler --context $NEBIUS_CONTEXT

# Get GKE credentials
KUBECONFIG=$TMP_KUBECONFIG gcloud container clusters get-credentials $GKE_CLUSTER_NAME --zone $GKE_ZONE

# Verify both contexts are available in the kubeconfig
kubectl config get-contexts --kubeconfig $TMP_KUBECONFIG

# Strip exec paths from the kubeconfig to avoid hardcoded paths in the kubeconfig
python -m sky.utils.kubernetes.exec_kubeconfig_converter --input $TMP_KUBECONFIG --output kubeconfig.converted

# Create a secret with the converted kubeconfig
kubectl create secret generic kube-credentials --kubeconfig $TMP_KUBECONFIG --context $GKE_CONTEXT \
  --namespace $NAMESPACE \
  --from-file=config=kubeconfig.converted

# Create a SkyPilot config that allows both contexts (GKE and Nebius) to be used simultaneously:
cat <<EOF > config.yaml
kubernetes:
  allowed_contexts:
    - $NEBIUS_CONTEXT
    - $GKE_CONTEXT
EOF
CONFIG_PATH=$PWD/config.yaml
Step 2: Deploy the API server#
Deploy the API server with helm:
helm repo add skypilot https://helm.skypilot.co
helm repo update

helm upgrade --install skypilot skypilot/skypilot-nightly --devel \
  --namespace $NAMESPACE \
  --create-namespace \
  --set-file apiService.config=$CONFIG_PATH \
  --set ingress.oauth2-proxy.enabled=true \
  --set ingress.oauth2-proxy.oidc-issuer-url=$OKTA_ISSUER_URL \
  --set ingress.oauth2-proxy.client-id=$OKTA_CLIENT_ID \
  --set ingress.oauth2-proxy.client-secret=$OKTA_CLIENT_SECRET \
  --set kubernetesCredentials.useApiServerCluster=false \
  --set kubernetesCredentials.useKubeconfig=true \
  --set kubernetesCredentials.kubeconfigSecretName=kube-credentials \
  --set gcpCredentials.enabled=true \
  --set gcpCredentials.projectId=$GCP_PROJECT_ID \
  --set nebiusCredentials.enabled=true \
  --set nebiusCredentials.tenantId=$NEBIUS_TENANT_ID
Note
If you need to reconfigure any of the values, you can simply run helm upgrade --install ... --reuse-values with only the changed values. --reuse-values will keep the existing values and only update the changed ones.
Here’s an explanation of all the arguments used in the helm chart installation:
Argument |
Description |
|---|---|
|
The Kubernetes namespace where SkyPilot will be installed |
|
Creates the namespace if it doesn’t exist |
|
Path to the SkyPilot config file that defines allowed Kubernetes contexts |
|
Enables OAuth2 proxy for authentication |
|
URL of the Okta OIDC issuer |
|
Okta client ID for OAuth2 authentication |
|
Okta client secret for OAuth2 authentication |
|
Disables using the in-cluster authentication for k8s (instead we use kubeconfig) |
|
Uses kubeconfig for cluster access |
|
Name of the secret containing the kubeconfig |
|
Enables GCP credentials |
|
GCP project ID |
|
GCP service account JSON credentials |
|
Enables Nebius credentials |
|
Nebius tenant ID |
Step 3: Get the endpoint and configure your DNS#
HOST=$(kubectl get svc ${RELEASE_NAME}-ingress-nginx-controller --namespace $NAMESPACE --kubeconfig $TMP_KUBECONFIG --context $GKE_CONTEXT -o jsonpath='{.status.loadBalancer.ingress[0].ip}')
ENDPOINT=http://$HOST
echo $ENDPOINT
If you see a blank address, wait a bit and try again. The GCP load balancer takes 1-2min to get an external IP.
Configure your DNS to point to the IP address of the API server. This is required for Okta to verify the redirect_uri configured by you in the Okta app. Alternatively, update the redirect_uri in the Okta app to use the IP address of the API server.
Try opening the endpoint in a browser. You should see the SkyPilot dashboard login page.
After logging in, you should be able to see the configured cloud and kubernetes infra on the dashboard.

SkyPilot dashboard showing available infra#
If the login page shows 503 error, make sure the API server pod is healthy:
kubectl get pods --namespace $NAMESPACE --kubeconfig $TMP_KUBECONFIG --context $GKE_CONTEXT
Step 4: Configure the CLI and launch your first job#
On your client(s), install the SkyPilot CLI:
pip install -U skypilot-nightly
Login to the API server:
sky api login -e $ENDPOINT # E.g., http://34.42.25.204 or http://sky.yourorg.com
A browser will open and you will be redirected to the Okta login page. Login with your Okta credentials. You will receive a token:

Copy the token and paste it in the CLI. You should see the following message:
$ sky api login -e http://sky.yourorg.com
Authentication is needed. Please visit this URL setup up the token:

http://sky.yourorg.com/token

Opening browser...
Paste the token:
Run sky check to verify cloud setup:
$ sky check
...
🎉 Enabled infra 🎉
  GCP [compute, storage]
  Kubernetes [compute]
    Allowed contexts:
    ├── nebius-cluster
    └── gke-cluster
  Nebius [compute]
🎉 SkyPilot API server is ready to use!#
Some commands to try:
sky dashboardto open the dashboard in your browsersky launch -c test --gpus H100:1 -- nvidia-smito launch a job with 1 H100 GPUsky gpus listto show available GPUssky statusto see SkyPilot status and infra available
✨ Bonus: Infiniband, Nebius shared filesystem, and volumes#
Configuring Infiniband on Nebius Kubernetes cluster#
To configure SkyPilot to use infiniband on Nebius:
Set the following config in your SkyPilot task YAML to enable InfiniBand:
config:
  kubernetes:
    pod_config:
      spec:
        containers:
        - securityContext:
            capabilities:
              add:
              - IPC_LOCK
Configure the environment variables in your SkyPilot task:
run: |
  export NCCL_IB_HCA=mlx5
  export UCX_NET_DEVICES=mlx5_0:1,mlx5_1:1,mlx5_2:1,mlx5_3:1,mlx5_4:1,mlx5_5:1,mlx5_6:1,mlx5_7:1
  ... your own run script ...
Note
Add the above config to the SkyPilot config (~/.sky/config.yaml global config or .sky.yaml project config) to have Infiniband configured automatically for all your jobs.
Refer to Using InfiniBand in Nebius with SkyPilot and NCCL test example for more details.
Shared storage with Nebius shared filesystem#
You can also use Nebius shared filesystem with SkyPilot to get high performance data storage for datasets, checkpoints and more across multiple nodes.
When creating a node group on the Nebius console, simply attach your desired shared file system to the node group (Create Node Group -> Attach shared filesystem):
Ensure
Auto mountis enabled.Note the
Mount tag(e.g.filesystem-d0).

Nebius will automatically mount the shared filesystem to hosts in the node group. You can then use a hostPath volume to mount the shared filesystem to your SkyPilot pods.
Here’s an example of how to use the shared filesystem in a SkyPilot job:
resources:
  infra: k8s/nebius-mk8s-nebius-gpu-dev

run: |
  echo "Hello, world!" > /mnt/nfs/hello.txt
  ls -la /mnt/nfs

config:
  kubernetes:
    pod_config:
      spec:
        containers:
          - volumeMounts:
              - mountPath: /mnt/nfs
                name: nebius-sharedfs
        volumes:
          - name: nebius-sharedfs
            hostPath:
              path: /mnt/<mount_tag> # e.g. /mnt/filesystem-d0
              type: Directory
Note
Add the above config field to the SkyPilot config (~/.sky/config.yaml global config or .sky.yaml project config) to have the shared filesystem mounted automatically for all your jobs.
Setup GPU metrics in Nebius Kubernetes cluster#
If you are using Nebius Kubernetes cluster, you can setup GPU metrics in the cluster to get real-time GPU metrics in the SkyPilot dashboard.
Install Prometheus.
First, create a prometheus-values.yaml file with the following configuration:
server:
  persistentVolume:
    enabled: true
    size: 50Gi
  retention: "1000d"
  retentionSize: "43GB"
  # scrape_timeout must be longer than the SkyPilot API server's
  # _PER_CONTEXT_TIMEOUT_SECONDS (20s in sky/server/metrics.py),
  # otherwise this Prometheus will time out scraping /gpu-metrics on
  # large clusters and mark the api-server target as down.
  global:
    scrape_timeout: 30s
kube-state-metrics:
  enabled: true
  metricLabelsAllowlist:
    - pods=[skypilot-cluster,skypilot-cluster-name]
prometheus-node-exporter:
  enabled: false
prometheus-pushgateway:
  enabled: false
alertmanager:
  enabled: false
Then install Prometheus using skypilot-prometheus as the release name:
helm repo add prometheus-community https://prometheus-community.github.io/helm-charts
helm repo update
helm upgrade --install skypilot-prometheus prometheus-community/prometheus \
  --namespace skypilot \
  --create-namespace \
  -f prometheus-values.yaml
Verify the skypilot-prometheus-server service was created:
kubectl get svc skypilot-prometheus-server -n skypilot
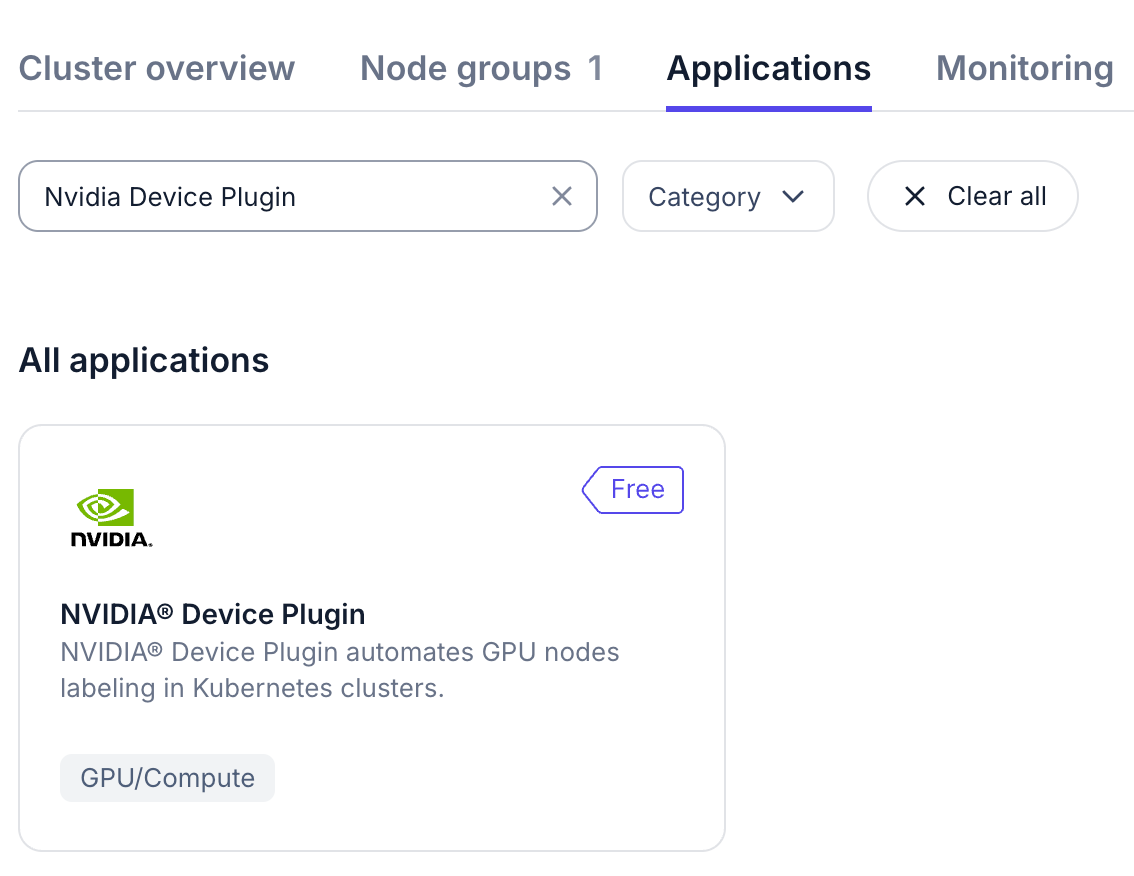
Install the Nvidia Device Plugin.
On Nebius console, in the detail page of the Nebius Kubernetes cluster, go to Applications -> Search for Nvidia Device Plugin -> Deploy -> Make sure to check the Enable GPU metrics monitoring -> Deploy application.
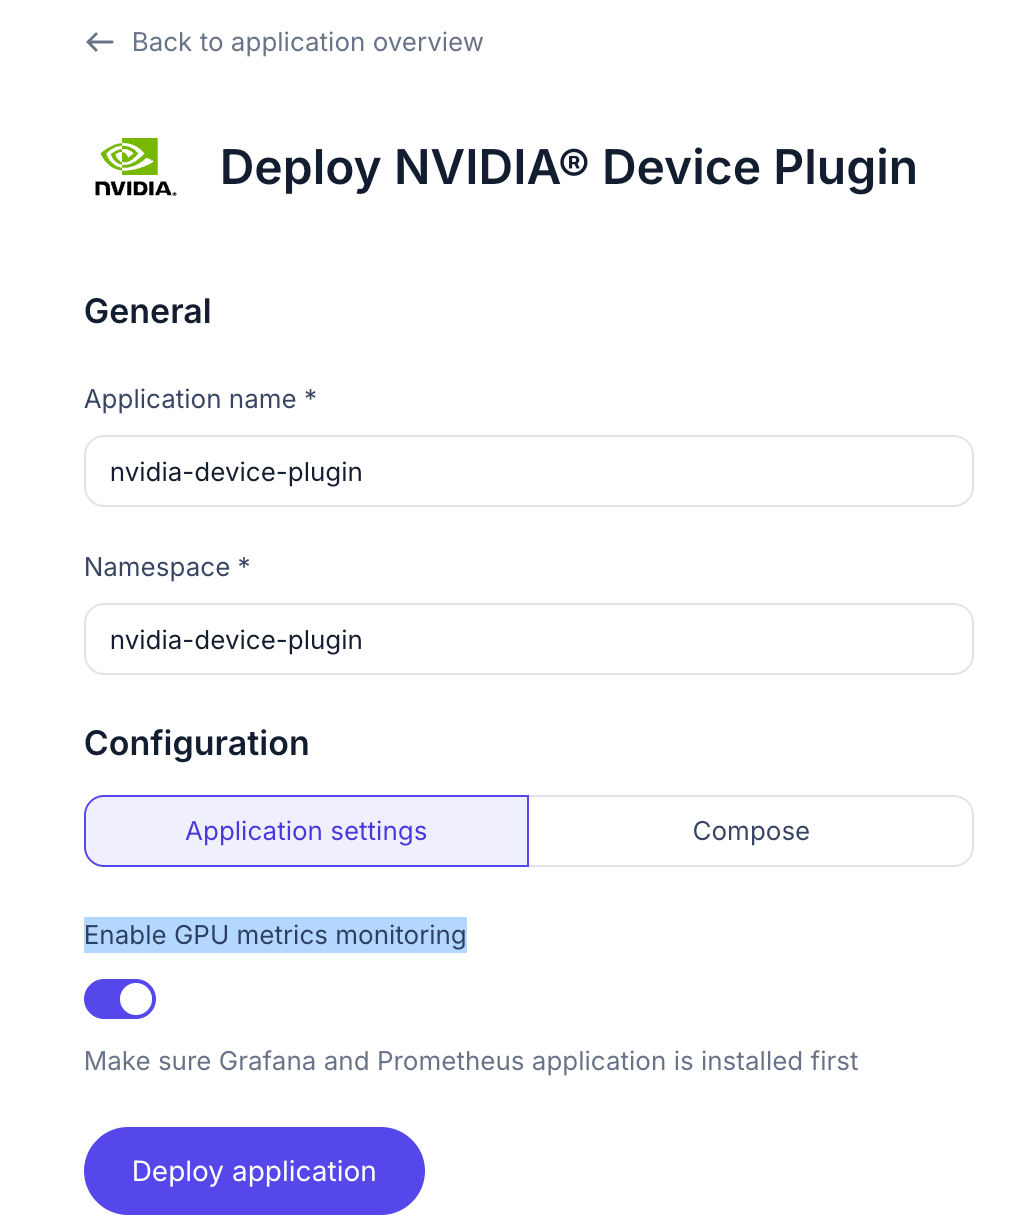
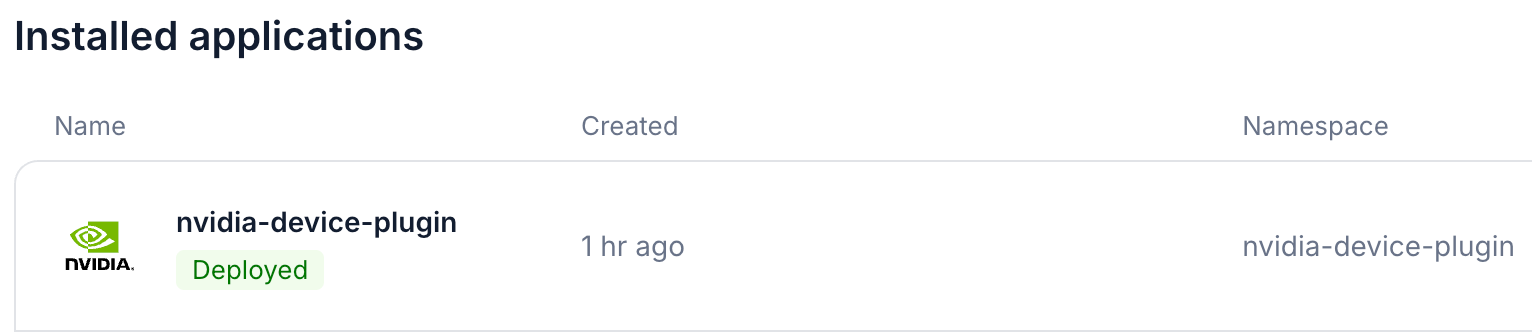
Wait for the Nvidia Device Plugin to be installed, the status badge will become Deployed.
You can also check the Pod status to verify the installation.
kubectl get pods -n nvidia-device-plugin
The dcgm exporter will be installed automatically.
If you are using multiple Kubernetes clusters, you will need to add the context names to
allowed_contextsin the SkyPilot config.
An example config file that allows using the hosting Kubernetes cluster and two additional Kubernetes clusters is shown below:
kubernetes:
  allowed_contexts:
  # The hosting Kubernetes cluster, you cannot set this if the hosting cluster is disabled by kubernetesCredentials.useApiServerCluster=false
  - in-cluster
  # The additional Kubernetes context names in the kubeconfig you configured
  - context1
  - context2
Refer to kubernetes.allowed_contexts for how to set the SkyPilot config in Helm chart values.
Refer to Set up DCGM metrics scraping to upgrade the API server to scrape the GPU metrics.
Now you should be able to see the GPU metrics in the SkyPilot dashboard.