AWS#
Note
By default, SkyPilot will use the credentials you have set up locally. For most cases, the installation instructions are all you need to do. The steps below are optional advanced configuration options, aimed primarily at cloud admins and advanced users.
Using AWS SSO#
AWS IAM Identity Center (successor to AWS Single Sign-On, or SSO) is supported.
Note
If you use AWS SSO and multiple clouds, check the SSO multi-cloud compatibility notes.
To use SSO, ensure that your machine has AWS CLI v2 installed. By default, pip install skypilot[aws] installs v1; v2 cannot be installed via pip. To use your newly installed AWS v2 CLI, use the aboslute path to the CLI (by default, /usr/local/aws-cli/aws) or create an alias alias awsv2=/usr/local/aws-cli/aws.
You can use the following to check version:
$ aws --version
aws-cli/2.25.6 ...
Visit your SSO login portal (e.g. https://my-sso-portal.awsapps.com/start), and click on Access keys under the corresponding account. Under “AWS IAM Identity Center credentials (Recommended)”, copy these values:
the
SSO start URLthe
SSO Region
Then, log into your SSO account:
$ aws configure sso
SSO session name: should be set, but you can choose any name you want.
SSO start URL: copy from the SSO login portal
SSO region: copy from the SSO login portal
SSO registration scopes: leave blank to use the default
Log in and approve the request in your web browser. Then back in the CLI, complete the remaining fields:
Default client Region: optional
CLI default output format: optional
Profile name: set to
defaultif you want to use this profile by default with SkyPilot, otherwise see Switching profiles or accounts.
If everything is set up correctly, sky check aws should succeed!
Multi-cloud access with SSO login#
SSO login has limited functionality across multiple clouds. If you use multiple clouds, you can set up a dedicated IAM user and access key so that instances launched on other clouds can use AWS resources.
Supported features: |
SSO credentials |
Static credentials |
|---|---|---|
Use S3 buckets on an AWS cluster |
✅ |
✅ |
Use S3 buckets on a cluster in another cloud |
❌ |
✅ |
Run managed jobs across multiple clouds |
🟡 [1] |
✅ |
Switching profiles or accounts#
You can use different AWS profiles or accounts to launch different clusters. SkyPilot will remember the owner identity of each cluster and properly protects any “write” operations. All clusters are shown in sky status.
Example of mixing the default profile and another profile:
$ # A cluster launched under the default AWS identity.
$ sky launch --cloud aws -c default

$ # A cluster launched under a different profile.
$ AWS_PROFILE=AdministratorAccess-12345 sky launch --cloud aws -c other-profile-cluster
If you are using a remote API server, the AWS credentials are configured on the remote server. Overriding AWS_PROFILE on the client side won’t work.
Using a specific VPC#
By default, SkyPilot uses the “default” VPC in each region. If a region does not have a default VPC, SkyPilot will not be able to use the region.
To instruct SkyPilot to use a specific VPC, you can use SkyPilot’s global config
file ~/.sky/config.yaml to specify the VPC name in the aws.vpc_name
field:
aws:
  vpc_name: my-vpc-name
See details in Advanced Configuration. Example use cases include using a private VPC or a VPC with fine-grained constraints, typically created via Terraform or manually.
To manually create a private VPC (i.e., all nodes will have internal IPs only), you can use the AWS console; see instructions here.
Dedicated SkyPilot IAM user#
You can optionally create a dedicated IAM user for SkyPilot with specifically granted permissions. Creating a dedicated user is not required — as long as you have AWS CLI credentials set up, SkyPilot will automatically use those credentials.
However, using a dedicated IAM user can have some benefits:
Avoid using your personal credentials with SkyPilot.
Specify minimal permissions to avoid granting broad access to SkyPilot.
If you use SSO login, enable some additional cross-cloud features.
Follow these steps to create a new AWS user:
Open the IAM dashboard in the AWS console and click on the Users tab.
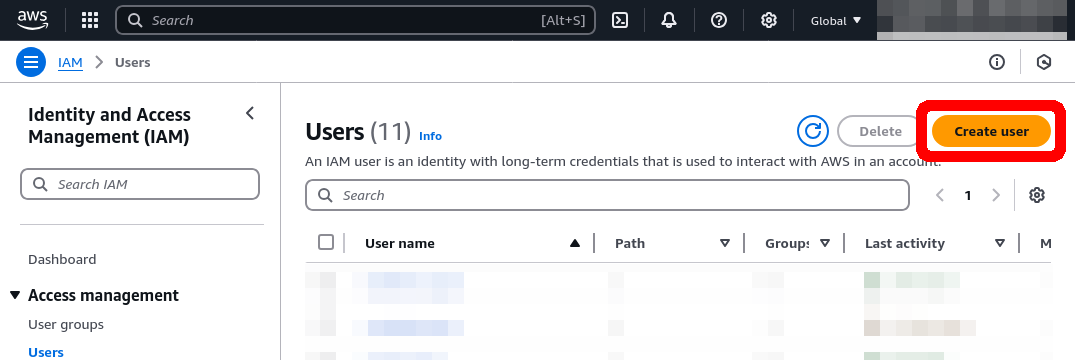
Then, click Create User and enter the user’s name. Click Next.
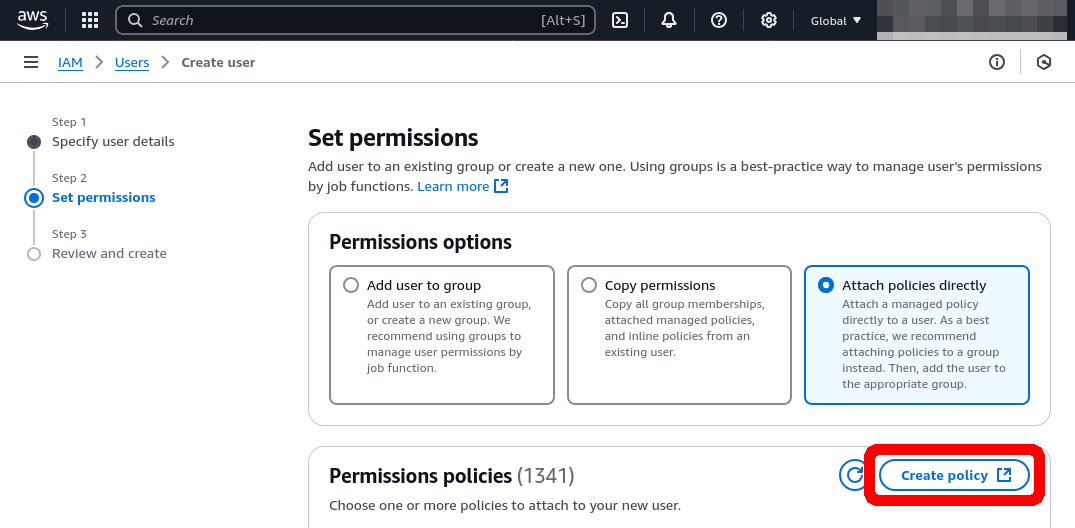
In the Permissions options section, select “Attach existing policies directly”. Depending on whether you want simplified or minimal permissions, follow the instructions below:
Search for the AdministratorAccess policy, and check the box to add it. Click Next to proceed.
Click on Create Policy.
This will open a new window to define the minimal policy. Follow the instructions to create a new policy: Minimal IAM policy.
Come back to this window, and in the Permissions policies box, click on the refresh button. You can now search for the policy you just created.
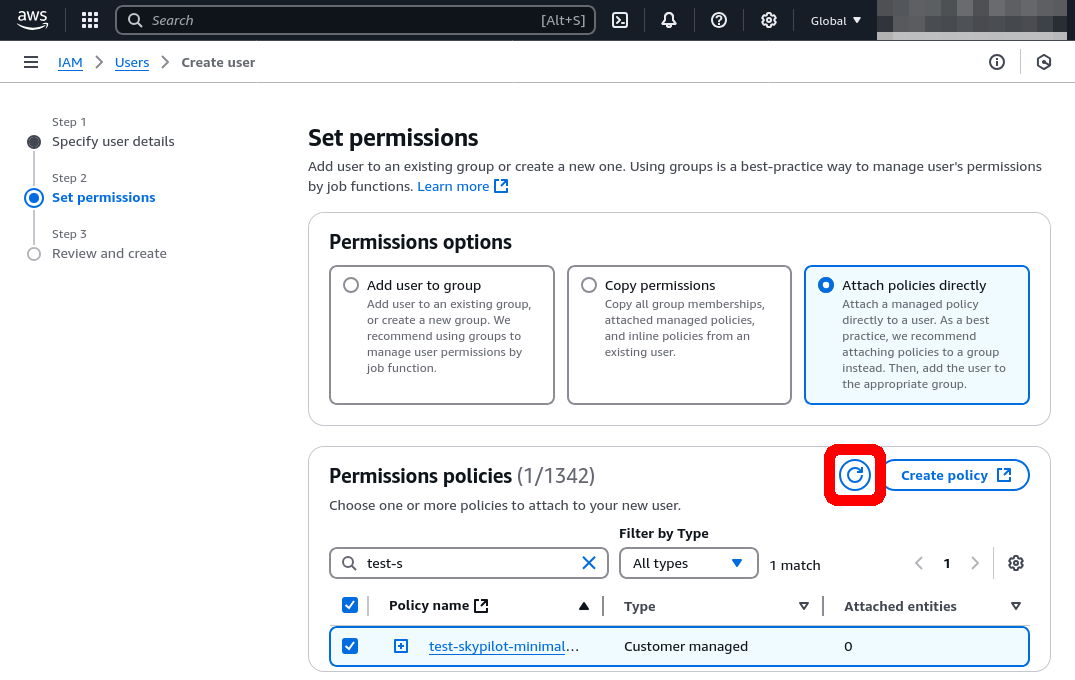
Check the box to add the policy, and click Next to proceed.
Click on Next and follow the instructions to create the user.
Select the newly created user from the dashboard, and go to the Security credentials tab. Click on Create access key.
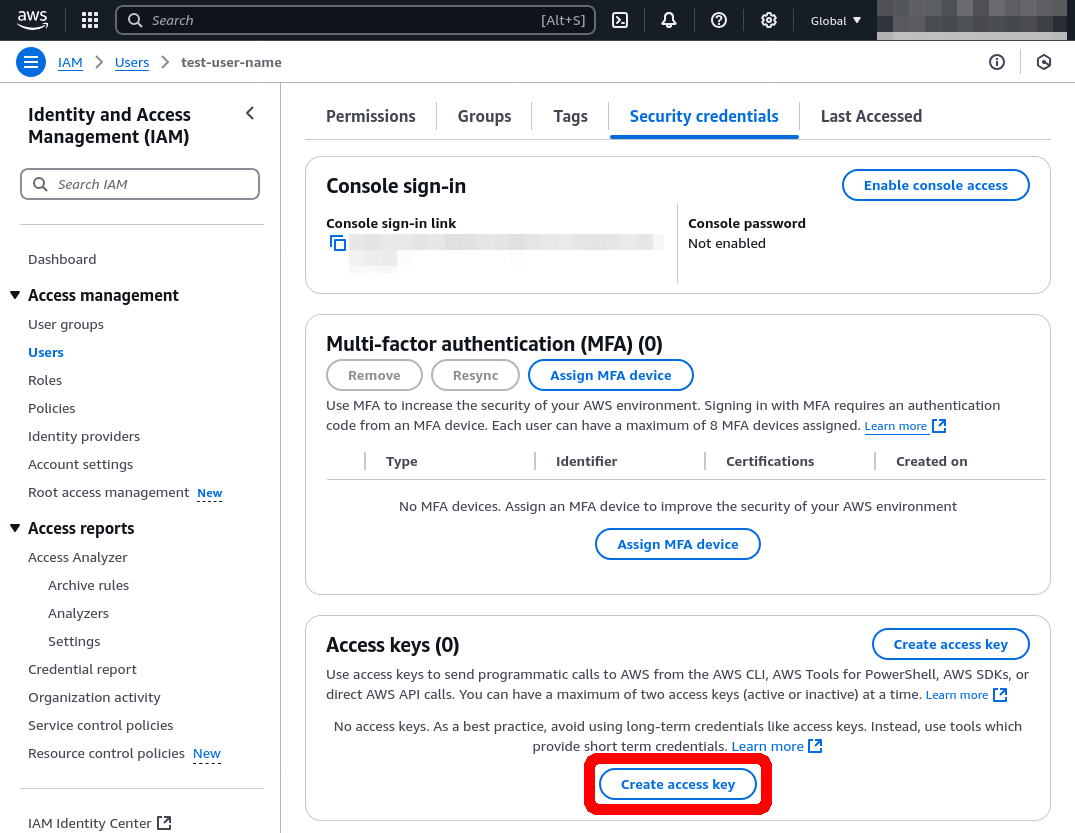
For “Use case”, select Other. Click Next, then click Create access key.
Use the newly created access key to configure your credentials with the AWS CLI:
$ # Configure your AWS credentials
$ aws configure
AWS Access Key ID [None]: <Access key>
AWS Secret Access Key [None]: <Secret access key>
Default region name [None]:
Default output format [None]:

$ # Check that AWS sees the shared-credentials-files
$ aws configure list
      Name                    Value             Type    Location
      ----                    -----             ----    --------
   profile                <not set>             None    None
access_key     ****************xxxx shared-credentials-file
secret_key     ****************xxxx shared-credentials-file
    region                <not set>             None    None

$ # Validate that credentials are working
$ sky check aws -v
Minimal permissions#
If you want to minimize the AWS permissions used by SkyPilot, you should set up the minimal permissions in two places:
User Account: the user account is the individual account of an user created by the administrator.
IAM role: the IAM role is assigned to all EC2 instances created by SkyPilot, which is used by the instances to access AWS resources, e.g., read/write S3 buckets or create other EC2 nodes. The IAM role is shared by all users under the same organization/root account. (If a user account has the permission to create IAM roles, SkyPilot can automatically create the role.)
Create a user account with minimal permissions#
Follow the instructions above for Dedicated SkyPilot IAM user. When setting permissions for the user, use the Minimal IAM policy rules below.
Create the internal IAM role for SkyPilot#
Note
In most cases, the IAM role will be automatically created. You only need to manually create the IAM role if you have excluded the optional role creation permissions from your minimal skypilot policy.
If you already have an IAM role called skypilot-v1 in your AWS account, it is likely created by SkyPilot automatically, and you can skip this section.
If you haven’t yet, create a minimal IAM policy for SkyPilot. If you previously created a dedicated IAM user with minimal permissions, you can re-use the same policy you used for the dedicated user.
In the IAM dashboard, go to the “Roles” tab, and click on Create role.

Select Trusted entity type: AWS service, and Use case: EC2, as seen in the image below.
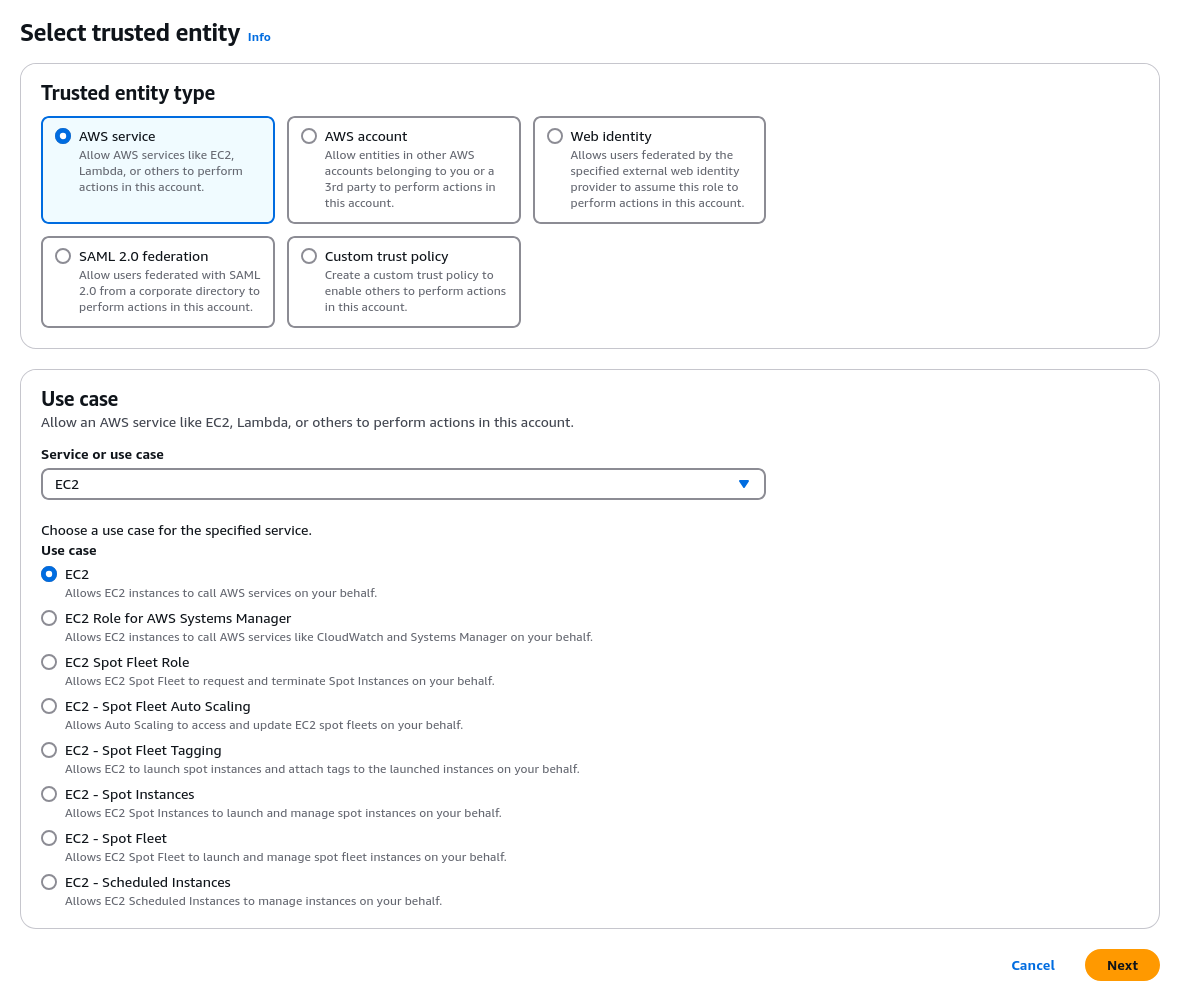
Click Next.
Search for and select the IAM policy from step 1.
Click Next, and name your role exactly
skypilot-v1. Click Create role.
Minimal IAM policy#
To avoid giving SkyPilot administrator access, you can create a policy that limits the permissions of the account.
When creating the policy, use the JSON policy editor. You can copy in the minimal policy rules and additional optional policy rules.
These are the minimal policy rules required by SkyPilot:
Note
Replace the <account-ID-without-hyphens> with your AWS account ID. You can find your AWS account ID by clicking on the upper right corner of the console.
Note
There are additional optional rules below. It’s likely that you will want to use some of these, so please take a look.
{
    "Version": "2012-10-17",
    "Statement": [
        {
            "Effect": "Allow",
            "Action": "ec2:RunInstances",
            "Resource": "arn:aws:ec2:*::image/ami-*"
        },
        {
            "Effect": "Allow",
            "Action": "ec2:RunInstances",
            "Resource": [
                "arn:aws:ec2:*:<account-ID-without-hyphens>:instance/*",
                "arn:aws:ec2:*:<account-ID-without-hyphens>:network-interface/*",
                "arn:aws:ec2:*:<account-ID-without-hyphens>:subnet/*",
                "arn:aws:ec2:*:<account-ID-without-hyphens>:volume/*",
                "arn:aws:ec2:*:<account-ID-without-hyphens>:security-group/*"
            ]
        },
        {
            "Effect": "Allow",
            "Action": [
                "ec2:TerminateInstances",
                "ec2:DeleteTags",
                "ec2:StartInstances",
                "ec2:CreateTags",
                "ec2:StopInstances"
            ],
            "Resource": "arn:aws:ec2:*:<account-ID-without-hyphens>:instance/*"
        },
        {
            "Effect": "Allow",
            "Action": [
                "ec2:Describe*"
            ],
            "Resource": "*"
        },
        {
            "Effect": "Allow",
            "Action": [
                "ec2:CreateSecurityGroup",
                "ec2:AuthorizeSecurityGroupIngress"
            ],
            "Resource": "arn:aws:ec2:*:<account-ID-without-hyphens>:*"
        },
        {
            "Effect": "Allow",
            "Action": "iam:CreateServiceLinkedRole",
            "Resource": "*",
            "Condition": {
                "StringEquals": {
                    "iam:AWSServiceName": "spot.amazonaws.com"
                }
            }
        },
        {
            "Effect": "Allow",
            "Action": [
                "iam:GetRole",
                "iam:PassRole"
            ],
            "Resource": [
                "arn:aws:iam::<account-ID-without-hyphens>:role/skypilot-v1"
            ]
        },
        {
            "Effect": "Allow",
            "Action": [
                "iam:GetInstanceProfile"
            ],
            "Resource": "arn:aws:iam::<account-ID-without-hyphens>:instance-profile/skypilot-v1"
        }
    ]
}
Optional: If you would like SkyPilot to automatically set up an IAM role and instance profile for EC2 instances, modify the last two rules in the policy with the highlighted four lines:
Warning
If you don’t do this, you must manually set up the IAM role that SkyPilot will use: see Create the internal IAM role for SkyPilot.
        {
            "Effect": "Allow",
            "Action": [
                "iam:GetRole",
                "iam:PassRole",
                "iam:CreateRole",
                "iam:AttachRolePolicy"
            ],
            "Resource": [
                "arn:aws:iam::<account-ID-without-hyphens>:role/skypilot-v1"
            ]
        },
        {
            "Effect": "Allow",
            "Action": [
                "iam:GetInstanceProfile",
                "iam:CreateInstanceProfile",
                "iam:AddRoleToInstanceProfile"
            ],
            "Resource": "arn:aws:iam::<account-ID-without-hyphens>:instance-profile/skypilot-v1"
        }
Optional: To enable sky launch --clone-disk-from, you need to add the following permissions to the policy above as well.
{
     "Effect": "Allow",
     "Action": [
         "ec2:CreateImage",
         "ec2:CopyImage",
         "ec2:DeregisterImage"
     ],
     "Resource": "*"
 }
Optional: To enable opening ports on AWS cluster, you need to add the following permissions to the policy above as well.
{
     "Effect": "Allow",
     "Action": [
         "ec2:DeleteSecurityGroup",
         "ec2:ModifyInstanceAttribute"
     ],
     "Resource": "arn:aws:ec2:*:<account-ID-without-hyphens>:*"
 }
Optional: If you would like to have your users access S3 buckets, you need to add the following permissions to the policy above as well.
{
     "Effect": "Allow",
     "Action": [
         "s3:*"
     ],
     "Resource": "*"
 }
Once you have added all needed policies, click Next and follow the instructions to finish creating the policy. You can give the policy a descriptive name, such as minimal-skypilot-policy.
Troubleshooting#
If your credentials are not being picked up, or you’re seeing the wrong credentials in SkyPilot, here are some steps you can take to troubleshoot:
Check
aws configure list. This command should show the currently configured credentials.If you have static credentials set up correctly, you should see something like this:
$ aws configure list
      Name                    Value             Type    Location
      ----                    -----             ----    --------
   profile                <not set>             None    None
access_key     ****************xxxx shared-credentials-file
secret_key     ****************xxxx shared-credentials-file
    region                <not set>             None    None
If you have SSO credentials set up correctly, you should see something like this:
$ aws configure list
      Name                    Value             Type    Location
      ----                    -----             ----    --------
   profile                <not set>             None    None
access_key     ****************xxxx              sso
secret_key     ****************xxxx              sso
    region                <not set>             None    None
Check
sky check aws. This should show whether SkyPilot is picking up the credentials and has the necessary permissions.$ sky check aws -v Checking credentials to enable clouds for SkyPilot. AWS: enabled [compute, storage] Activated account: VRSC9IFFYQI7THCKR5UVC [account=190763068689] ...
Common issues#
Wrong profile is enabled. SkyPilot will respect the
AWS_PROFILEenvironment variable if it is set; see Switching profiles or accounts. IfAWS_PROFILEis not set, SkyPilot will use the profile nameddefault.You may have previously set
AWS_PROFILEin your.bashrcfile or similar. Try to double-check the value:$ # Check the account being used by skypilot $ sky check aws -v Checking credentials to enable clouds for SkyPilot. AWS: enabled [compute, storage] Activated account: XXXXXXXXXXXXXXXXXXXXX:user [account=123456789012] ... $ # AWS account 1234-5678-9012 is enabled via @user SSO login. $ # See the currently enabled profile. $ aws configure list Name Value Type Location ---- ----- ---- -------- profile AWSPowerUserAccess-123456789012 env ['AWS_DEFAULT_PROFILE', 'AWS_PROFILE'] access_key ****************xxxx sso secret_key ****************xxxx sso region <not set> None None $ # SSO profile AWSPowerUserAccess-123456789012 is enabled $ # via environment variable. $ # See details of the currently enabled AWS account and user/role. $ aws sts get-caller-identity $ # See if the environment variable has been set. $ echo $AWS_PROFILE AWSPowerUserAccess-123456789012 $ unset AWS_PROFILE $ # Delete from .bashrc/.zshrc to make the change permanent. $ # Now, default profile will be used. $ aws configure list Name Value Type Location ---- ----- ---- -------- profile <not set> None None ... $ sky check aws -v Checking credentials to enable clouds for SkyPilot. AWS: enabled [compute, storage] Activated account: XXXXXXXXXXXXXXXXXXXXX [account=987654321098] ... $ # Now AWS account 9876-5432-1098 is enabled via default profile.
Profile is not set. If
sky check awsandaws configure listcannot find credentials, you may not have a default profile set.If the environment variable
AWS_PROFILEis set, this profile name will be used.If there is a profile named
default, it will be used.Otherwise, the profile will not be accessible.
Even if there is only one profile, it will not be used unless
AWS_PROFILEis set or the profile is nameddefault.In AWS CLI v1, you can check
~/.aws/credentialsand~/.aws/configto look for profile names. In AWS CLI v2, you can check from the CLI.$ # AWS CLI v2 only $ aws --version aws-cli/2.25.6 ... $ # List all profiles $ aws configure list-profiles AWSPowerUserAccess-xxxxxxx default
If there is no
defaultprofile, you can edit the configuration directly:# ~/.aws/config [profile default] sso_session = my-skypilot-session sso_account_id = XXXXXXXXXX ...
# ~/.aws/config
[default]
aws_access_key_id = XXXXXXXXXXXXXXXXXXXX
aws_secret_access_key = XXXXXXXXXXXXXXXXXXXXXXXXXXXXXXXXXXXXXXXX
Or, you can set the
AWS_PROFILEenvironment variable in your shell config:# .bashrc / .zshrc # Enable AWS profile named "AWSPowerUserAccess-123456789012" export AWS_PROFILE='AWSPowerUserAccess-123456789012'